Intro

LICENSE

You can create 1 website (on a single domain) for yourself or for your client. You can then transfer that website to your client for any fee. In that case, the license is also transferred to your client. You can install the theme on your test server for testing/development purposes (this installation should not be available to the public).

With a single regular license you are not allowed to create multiple websites. For multiple websites you will need multiple regular licenses. For more information regarding license regulations and policies, read about the ThemeForest Licenses: Standard Licenses, Regular License.

SUPPORT POLICY

In order to receive a technical support assistance, you need to have a valid purchase code.

As authors of this theme we do provide support only for the theme-related features. We do not provide support for additional customization, 3rd party plugins integration or any other compatibility issues that might arise. We will respond as soon as possible (within 24 – 48 hours, usually faster).

Please read more here: https://themeforest.net/page/item_support_policy

BUNDLED PLUGINS

Bundled plugins (WPBakery Page Builder) are fully functional without the activation of a registration license key. In case you are willing to receive automatic updates and support from the plugin team, you will need to purchase the plugin separately. Only the direct buyers get the plugin license key.

Hosting

Our theme requires you to have WordPress installed and running on a web hosting account. We recommend that you stay away from shared hosting options, and instead go for a WordPress Hosting or a VPS Hosting option.
Structure

THEME REQUIREMENTS

Recommended Requirements: WordPress 5 or higher, PHP 7 or higher, MySQL 5.6 or higher.
However, to use this theme you must be running at least WordPress 4, PHP 5.6, MySQL 5 or higher. If you use a hosting service with limited resources, you may experience issues with the demo import.

We recommend that you contact your web hosting service provider to make sure that your server PHP configuration limits are as follows:

max_execution_time 600
memory_limit 128M
post_max_size 32M
upload_max_filesize 64M

If you are running unmanaged dedicated server or VPS, you should check your php.ini file. Alternatively, you can edit .htaccess file in the root of your website and add the following values:

php_value max_execution_time 600
php_value memory_limit 128M
php_value post_max_size 64M
php_value upload_max_filesize 64M
IMPORTANT: Setting these values will ensure you will not get error messages during the demo import.

THEME INSTALLATION

Before installing the theme, please make sure you unpacked the archive and extracted the theme files. If you try to install the wrong files, you will get the missing styles.css error. This is the most common error that means you are trying to install an incorrect package.

There are 2 ways to install the theme:

  • via FTP:
    1. Log into your web server with FTP client software.
    2. Unzip the theme-name.zip file and ONLY use the extracted /theme-name theme folder.
    3. Upload the extracted theme-name folder into /wp-content/themes/.
    4. Navigate to the Appearance > Themes tab and activate the theme.
  • via WordPress admin panel:
    1. Log into the WordPress admin panel.
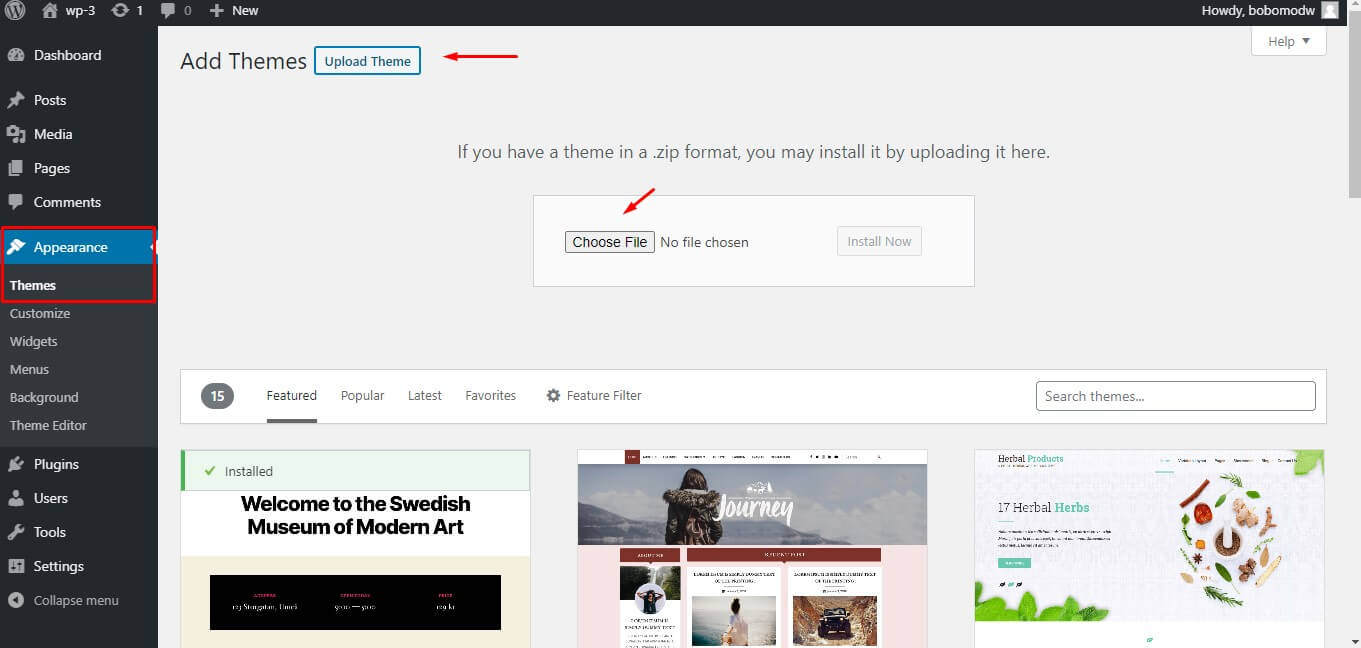
    2. Navigate to Appearance > Themes and click on Add New and Upload Theme.
    3. Select the theme-name.zip folder and click Install Now button.
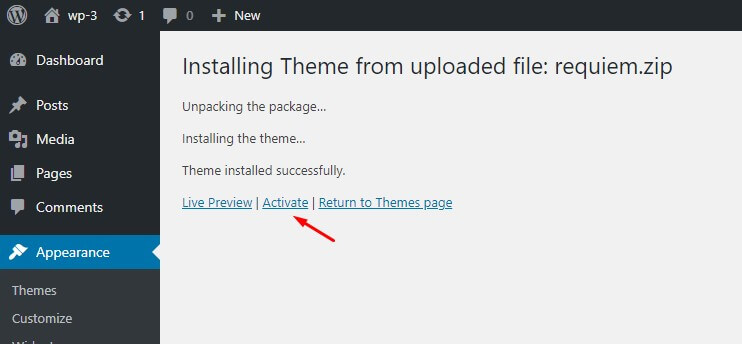
    4. After the successful installation, click on Activate or navigate to the Appearance > Themes and click on Activate button to activate the newly installed theme.

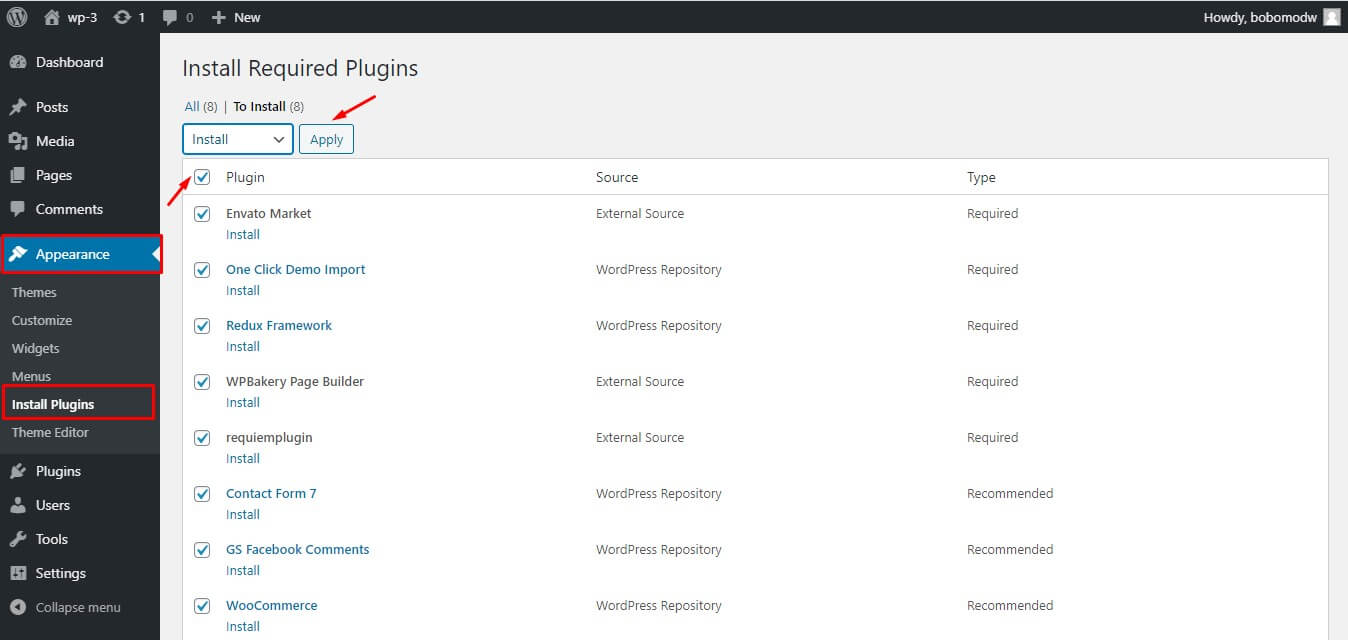
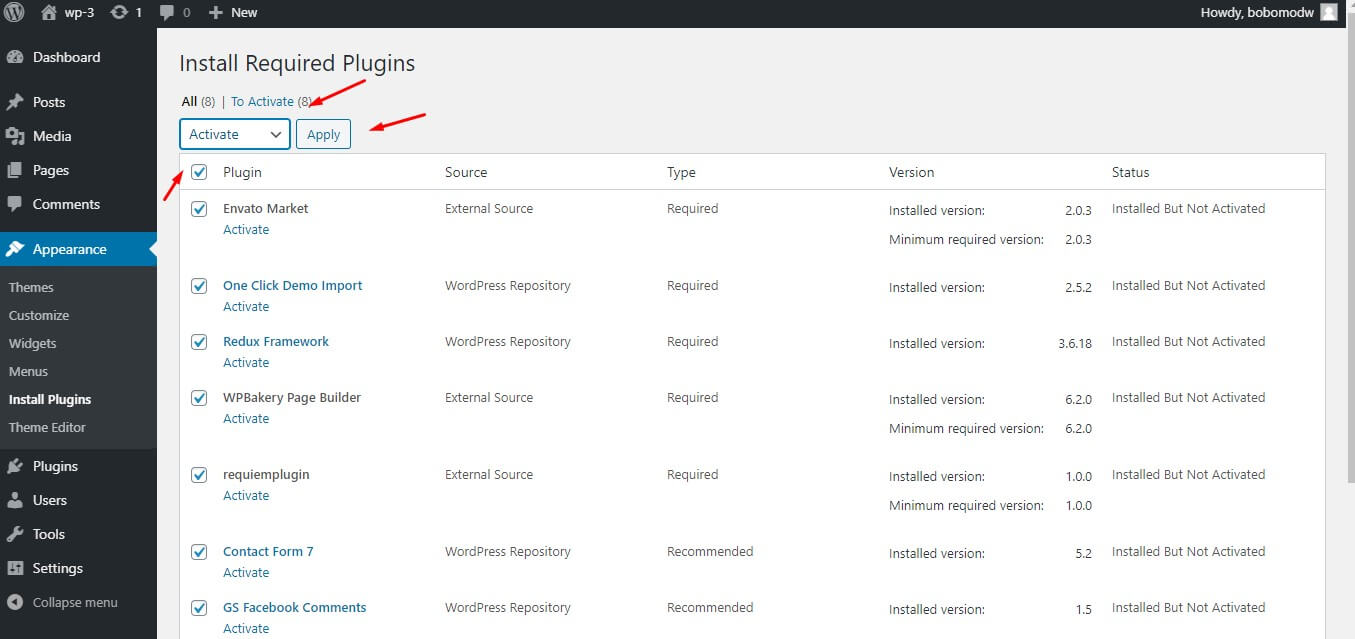
INSTALL AND ACTIVATE PLUGINS

Please install and activate the required plugins after the theme is activated.

CHILD THEME

If you plan on making changes to the theme's files and functions, we recommend installing a child theme. Inside the main zip file downloaded from ThemeForest, you will find a child theme.

Demo Import

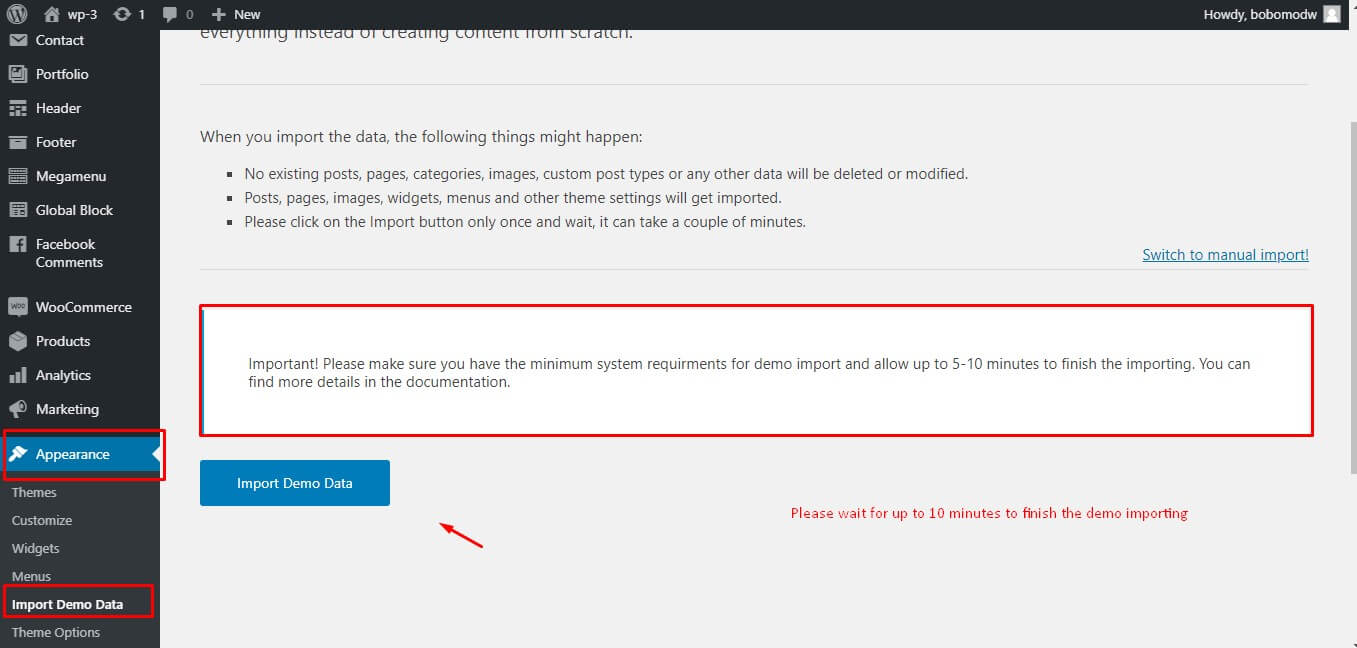
Go to Appearance > Import Demo Data. Click de import demo data button and the button and wait for up to 10 minutes to finish the importing. It will import all content from our live preview (text, images, pages, menus etc)

NOTE: Please make sure you have the minimum theme requirments for importing the demo.
max_execution_time 600
memory_limit 128M
post_max_size 32M
upload_max_filesize 64M

COMMON INSTALLATION ERRORS

Link is expired - try again when uploading the theme in admin panel

There are two ways to solve this problem.

  1. Contact your web hosting service provider to increase your upload_max_filesize to 64M.
  2. Upload the extracted theme package via an FTP client to wp-content/themes/ directory.

Fatal error: allowed memory size of xx bytes exhausted (tried to allocate xx bytes)

The error occurs because of the low memory_limit. You can increase memory_limit on your server in several ways, namely by editing:

  1. wp-config.php file: define('WP_MEMORY_LIMIT', '128M');
  2. php.ini: memory_limit = 128M;
  3. .htaccess file: php_value memory_limit 128M;

Fatal error: call to undefined function mb_strtolower() in ….

Please contact your web hosting service provider to enable mbstring PHP function in server settings. The function is needed for some languages, such as Japanese, Chinese etc.

The demo import is stuck

Please contact your web hosting service provider to make sure that your PHP configuration limits are as follows:

  • max_execution_time 600
  • memory_limit 128M
  • post_max_size 64M
  • upload_max_filesize 64M

Are you sure you want to do this? Please try again.

Most likely your web server is configured with low PHP settings that only allow a certain size ZIP file to be uploaded via WP admin.

  1. Contact your web hosting service provider to increase your upload_max_filesize to 64M.
  2. Upload the extracted theme package via an FTP client to wp-content/themes/ directory.

Theme Update

This step is required if you received the notification that a new version of the theme is available. Before you go ahead with the update make sure to backup your old theme's folder. Download it to your computer locally. Also, please backup your entire site before updating a theme (You can use UpdraftPlus)

Update Option 1. Using the Envato Market plugin (Recommnended)

https://envato.com/market-plugin/

Update Option 2. Update using FTP client

  1. Log into your ThemeForest account and get the last version of the theme as described above.
  2. Connect to your server using desktop client software (we recommend Filezilla and CyberDuck).
  3. Go to directory /wp-content/themes/.
  4. Remove/rename existing folder with old theme files.
  5. Unpack the theme installable files downloaded from ThemeForest and upload them to the /wp-content/themes/ folder.
IMPORTANT: Please do not update the theme by deleting it from Appearance > Themes and then uploading it again. The best option for updating the theme is with the Envato Market plugin.

Plugins Update

Update (if necessary!) the included plugins, if you see a notification message prompting about a newer version. For plugins bundled with the theme (WPBakery Page Builder, obqjacplugin), simply deactivate then delete them and you will see a notification to install the required plugin.

After Theme Installation

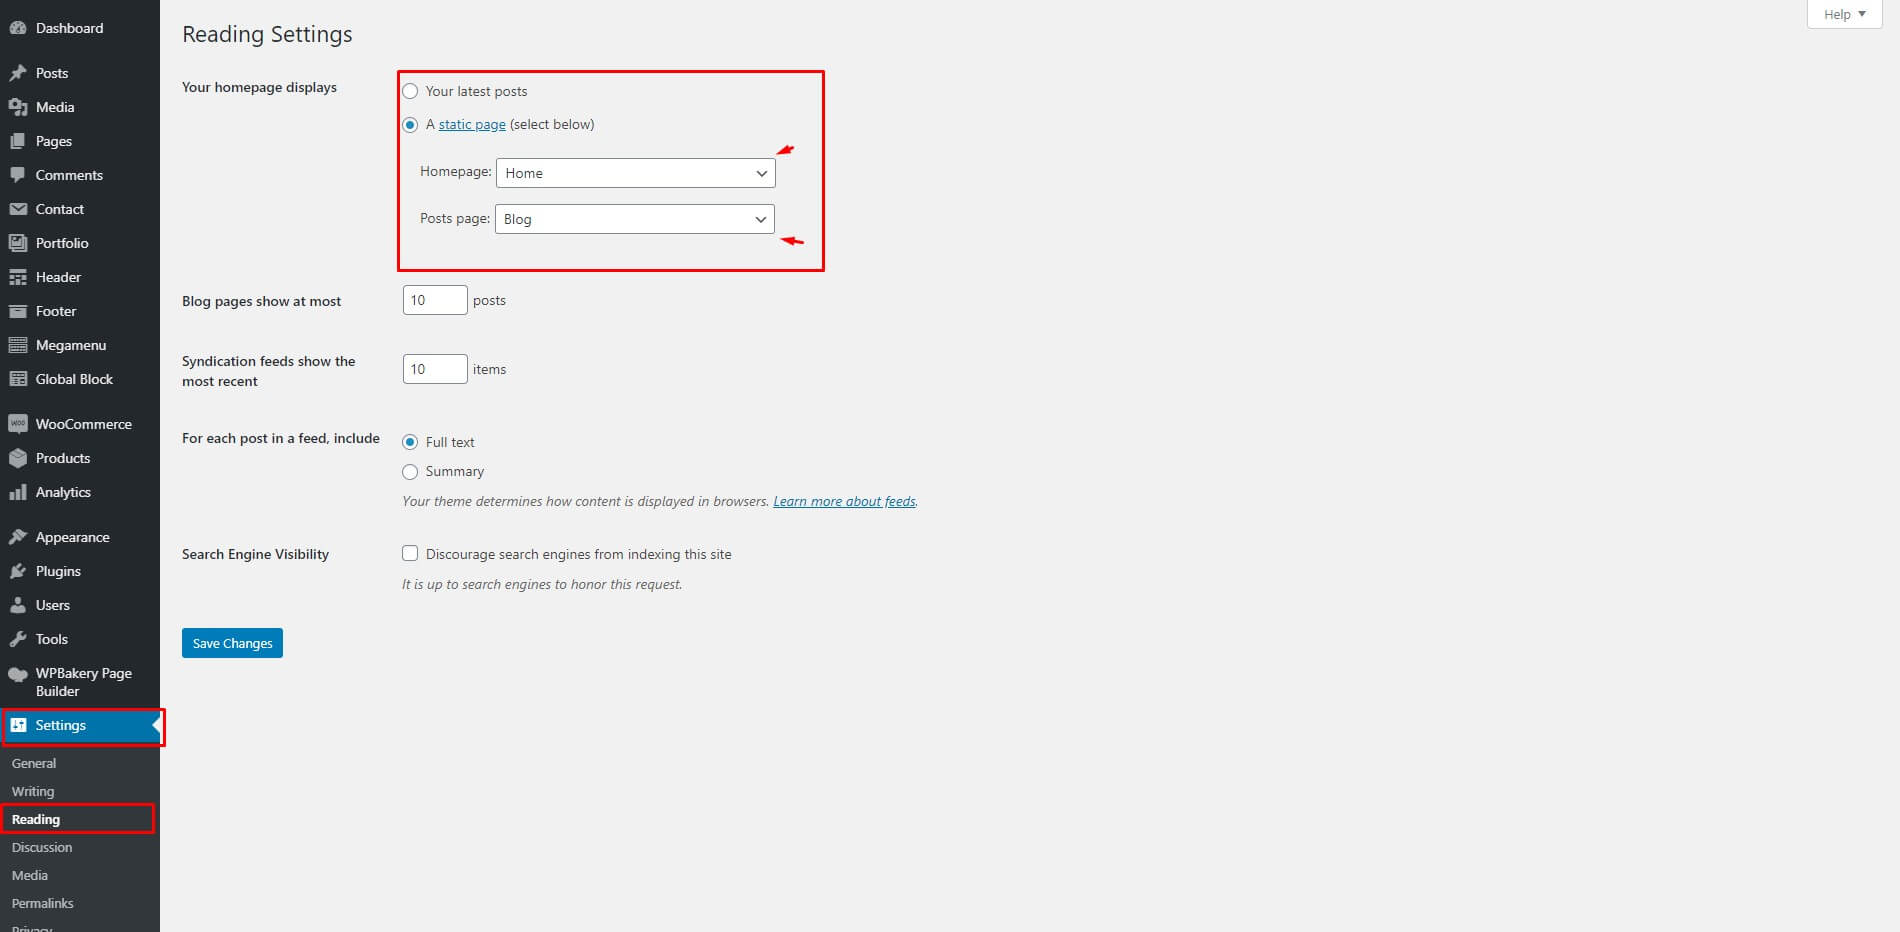
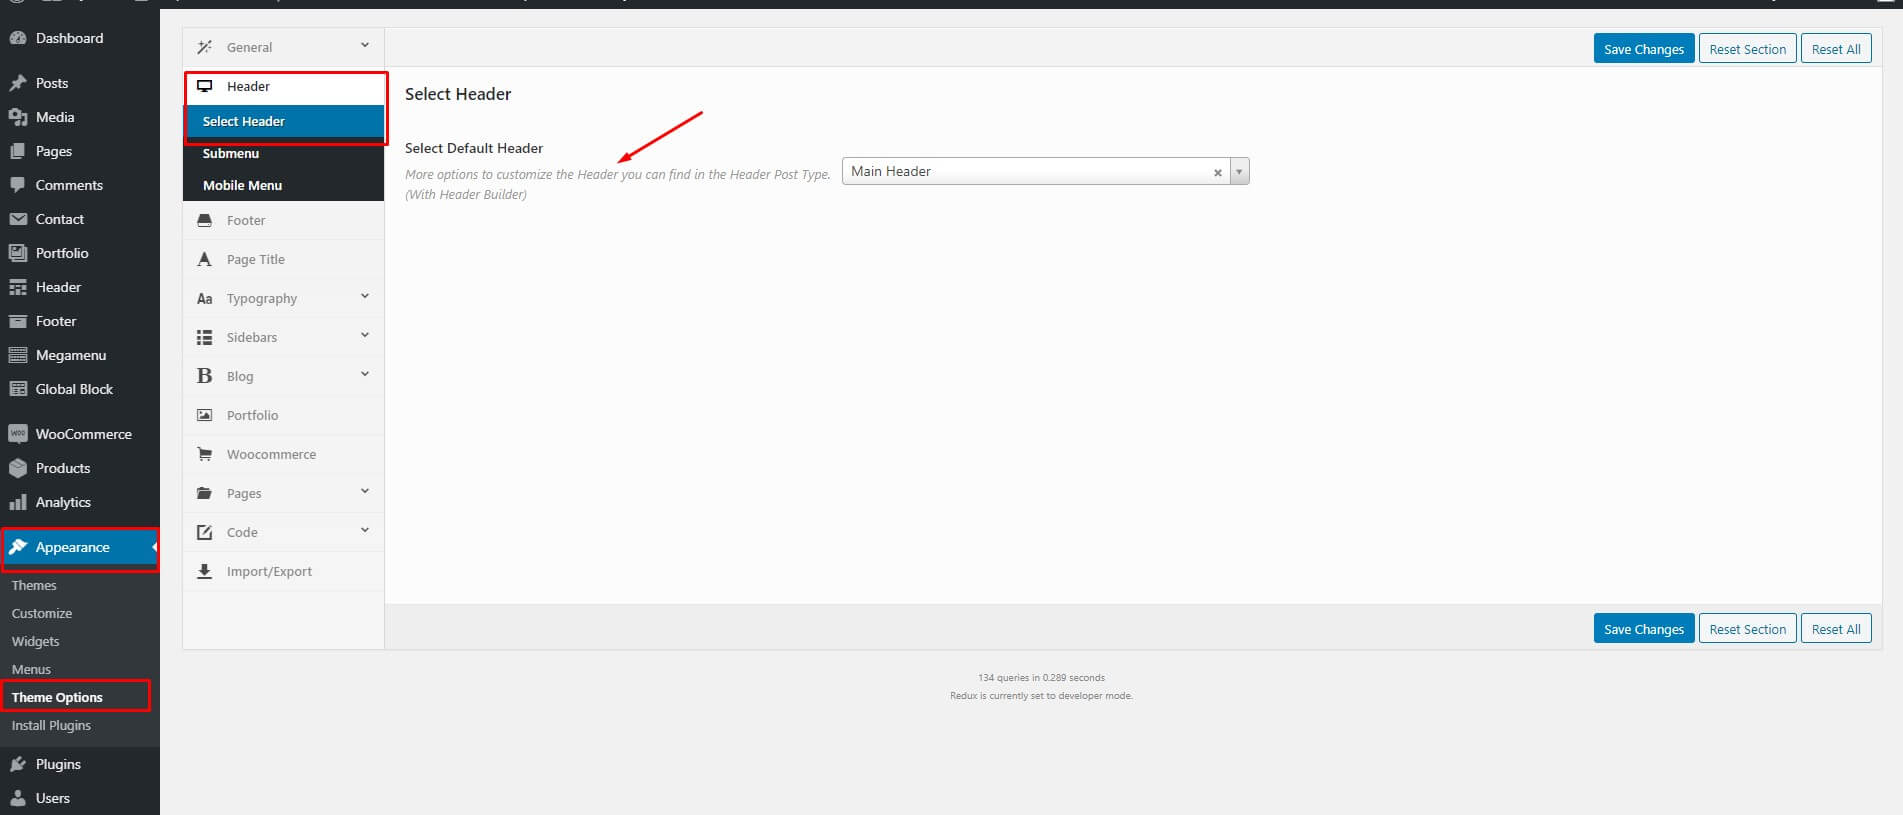
After the installation of the theme finished and you don't want to import the demo content and options, there are a few steps you need to do: Setting the home and blog pages, setting the global header and footer in the Theme Options, creating a menu and setting it up.

Setting Home And Blog Pages

Setting Up the Header

Posts

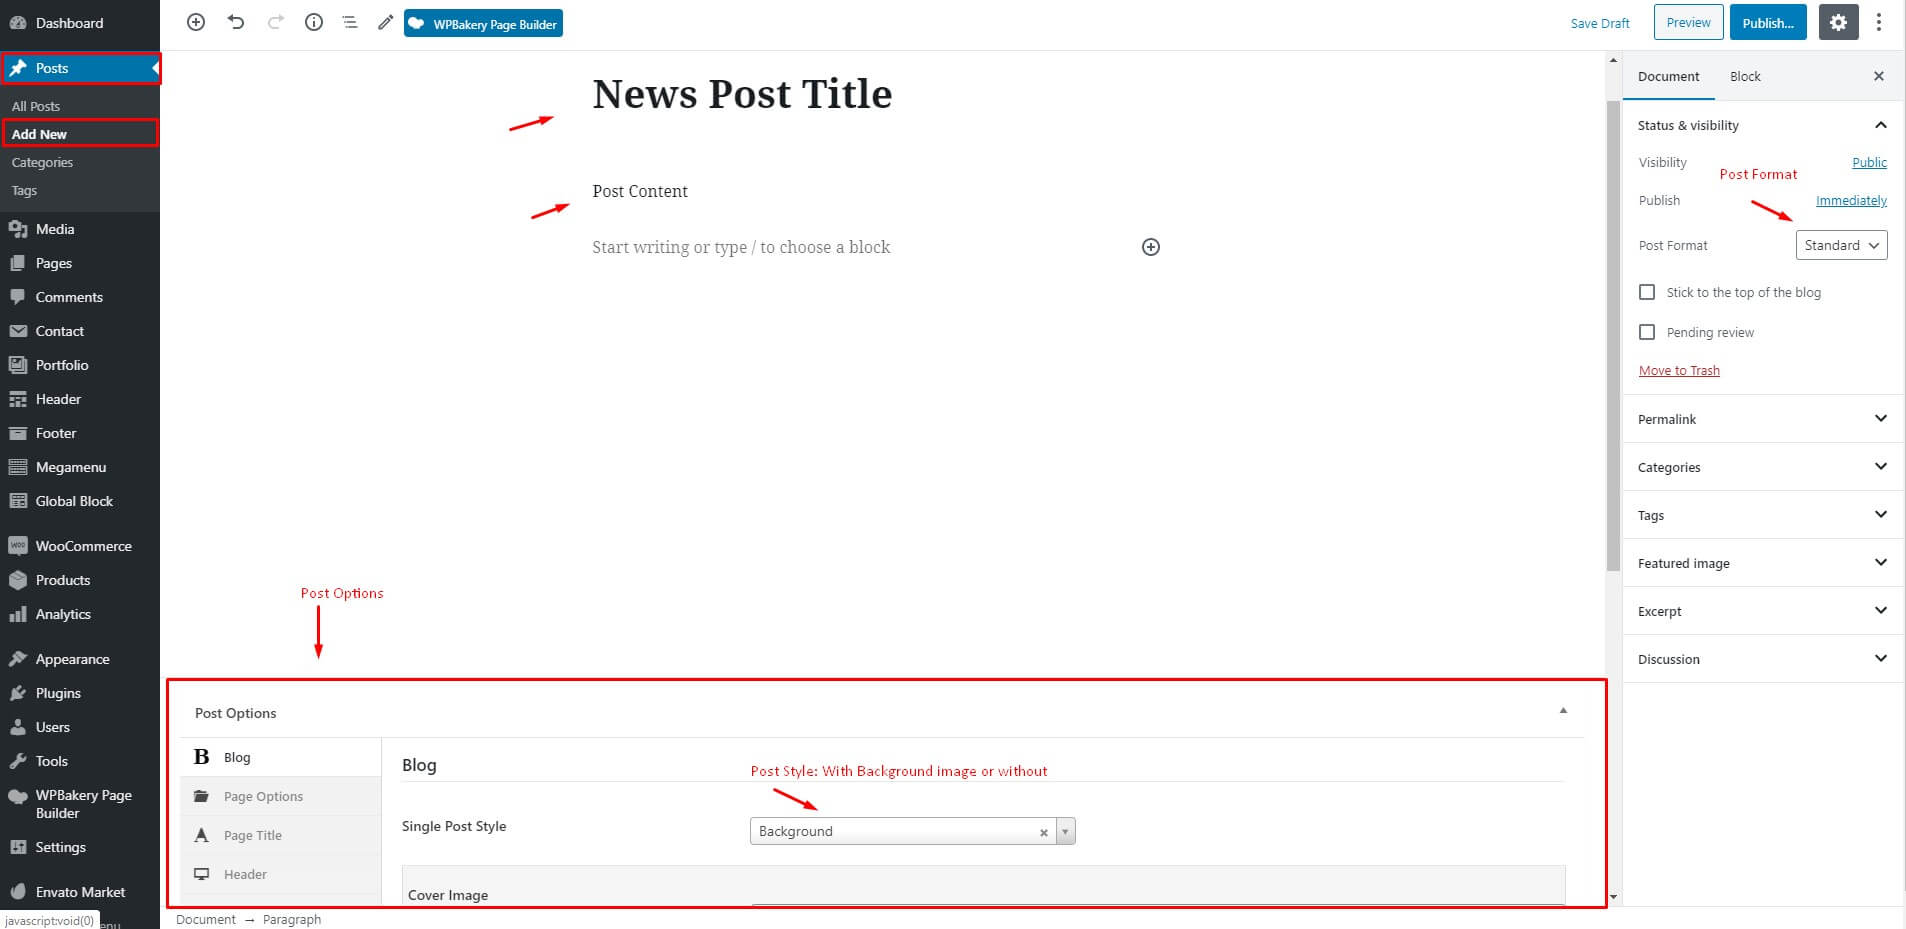
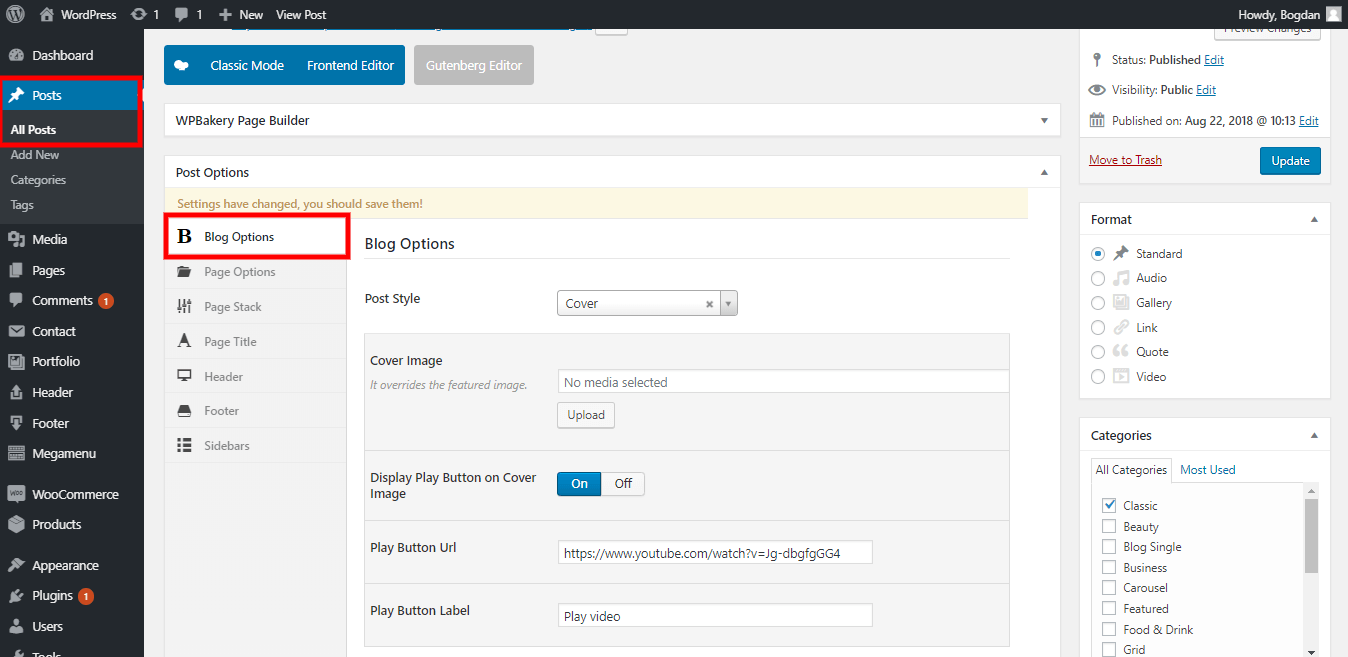
To create a new blog post, go to Posts > Add New from your WordPress admin panel. First, you need to enter a title for your blog post in the text field near the top of the screen. Choose a format for your blog post in the Format section on the right side of the screen. Below you have the single post options (meta boxes)

Post options

You can also customize single posts with Meta boxes. For archive pages see the Theme Options settings.

Pages

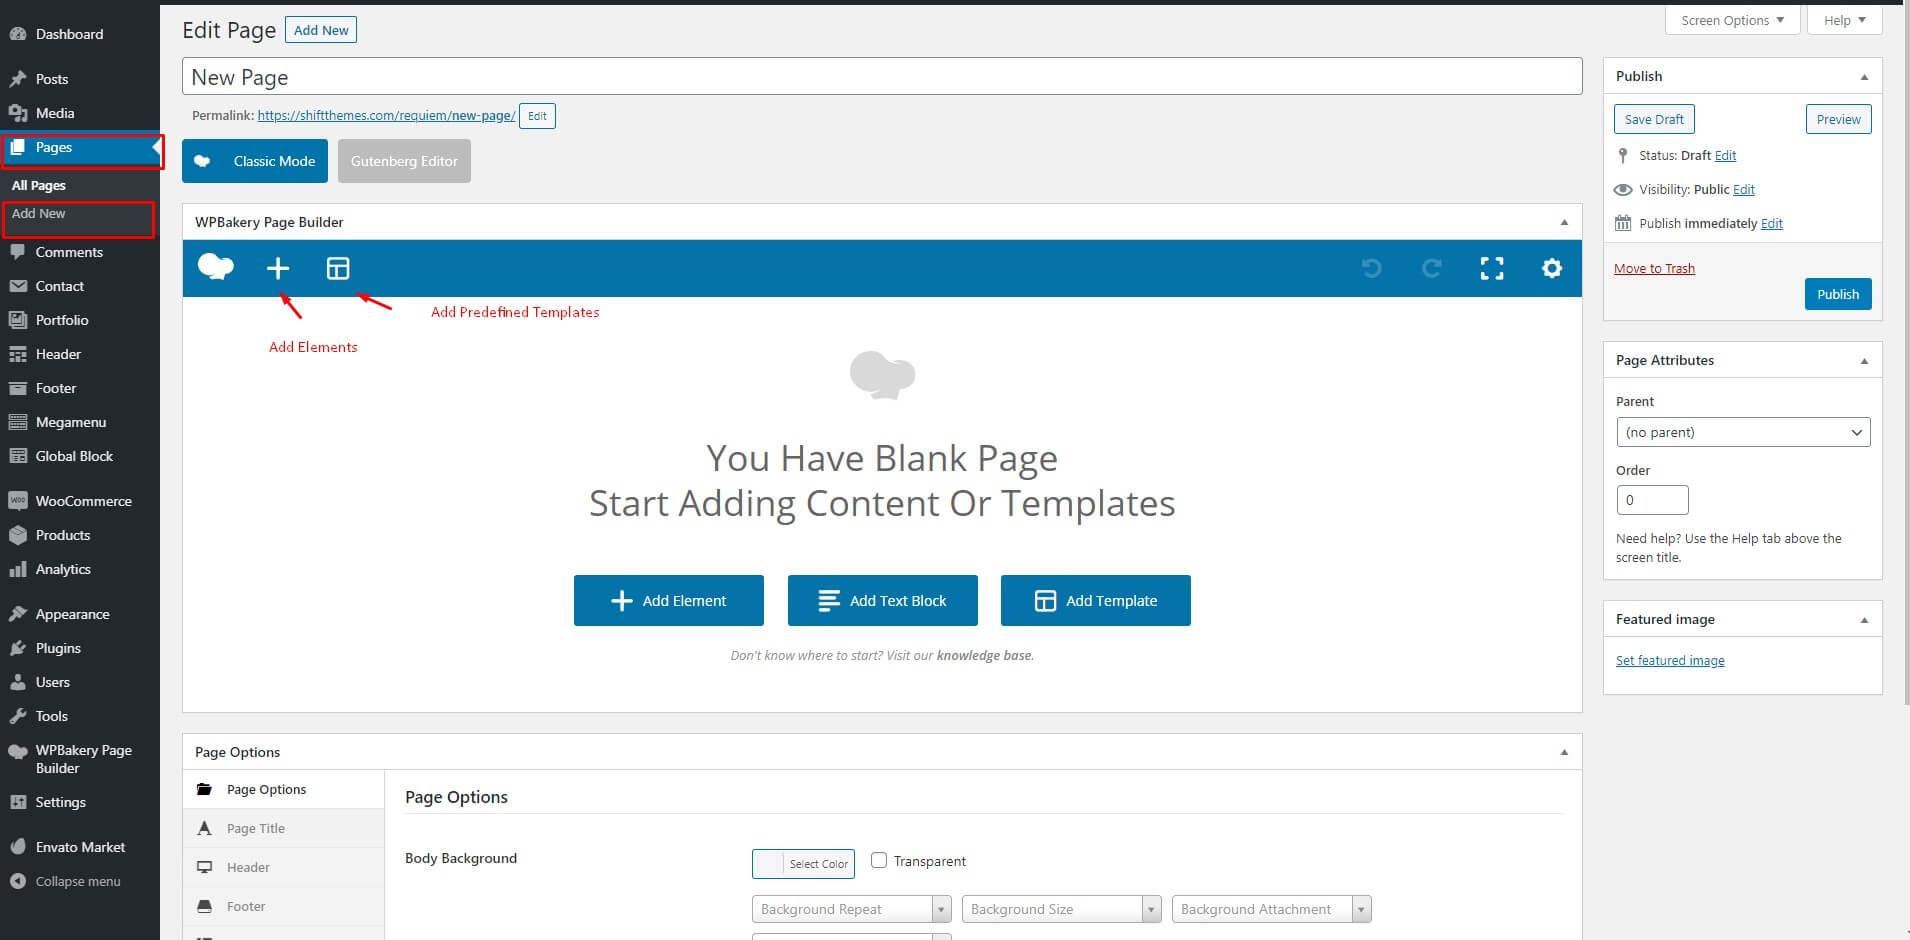
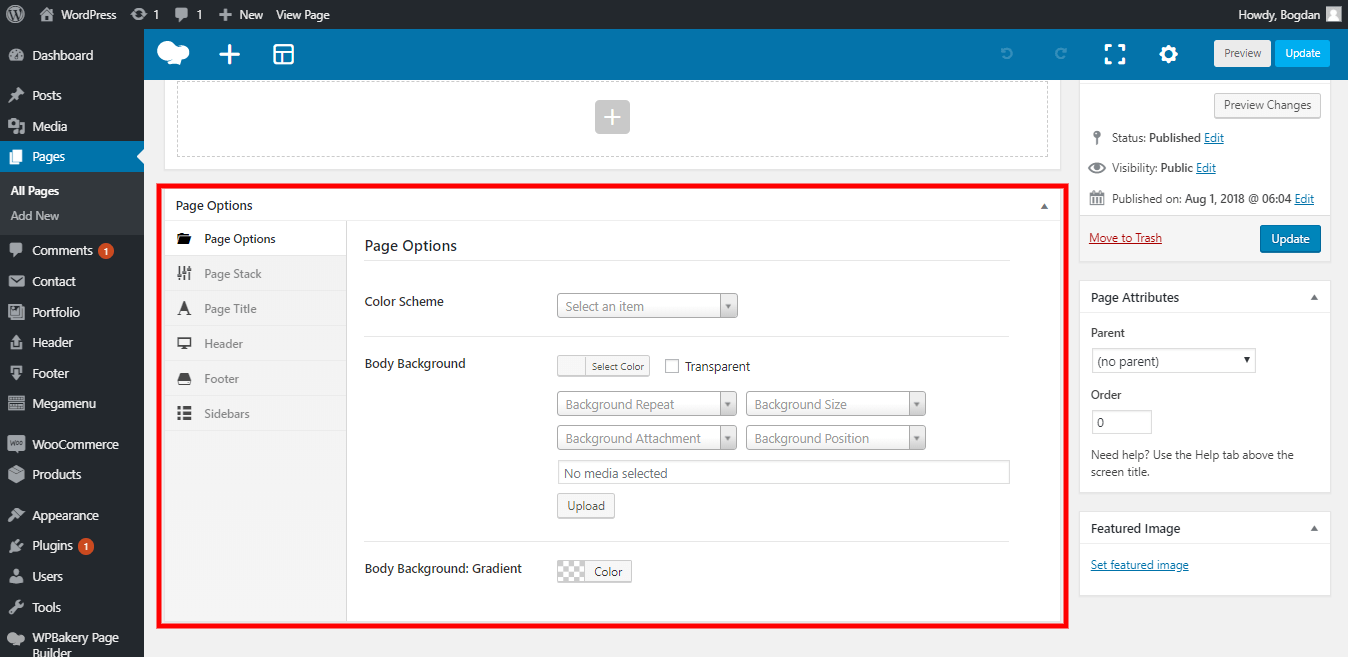
To create a new page, go to Pages > Add New from your WordPress admin panel. First, you need to select WPBakery Page Builder as your main tool to create pages. Then, you can choose Elements or Predefined Templates to work with.

Page options

These settings are applied to the page you are editing, and will overwrite the global settings specified in Theme Options. Please take a few minutes to familiarize yourself with the Page Options.

Portfolio

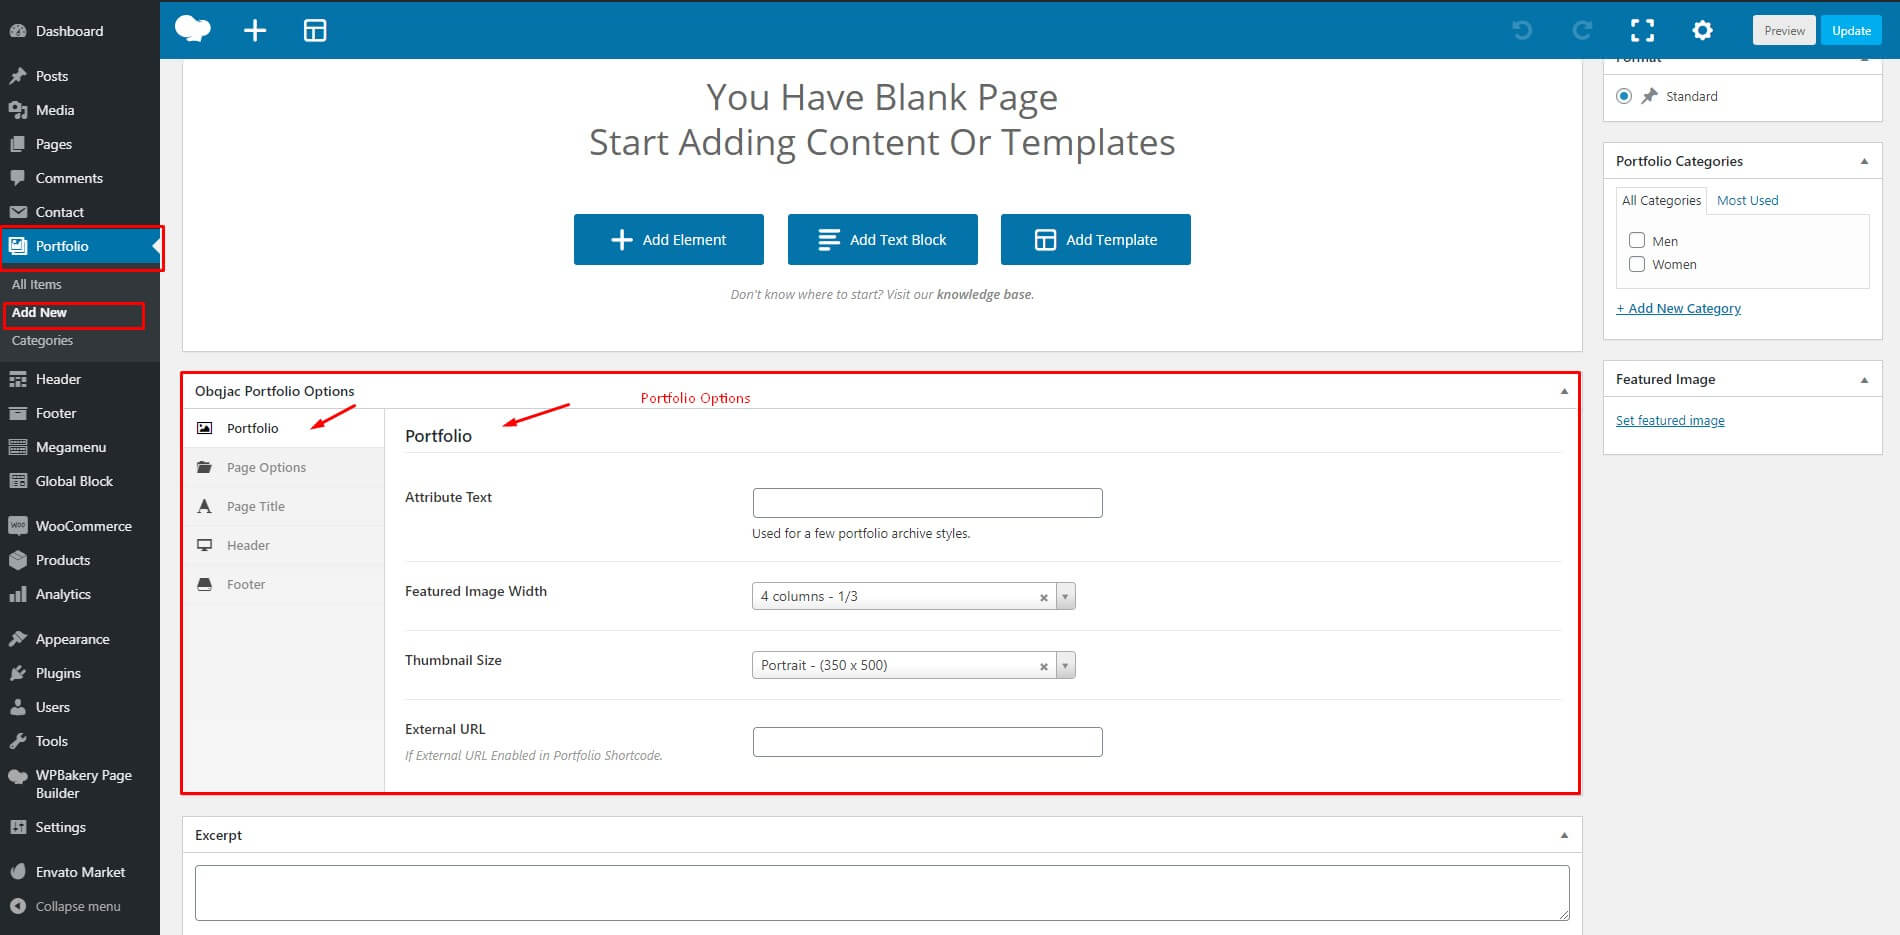
To create a new portfolio, go to Portfolio > Add New from your WordPress admin panel. It's better and easier to use the pre-defiend templates of the theme to get started with a portfolio template.

Portfolio Slug

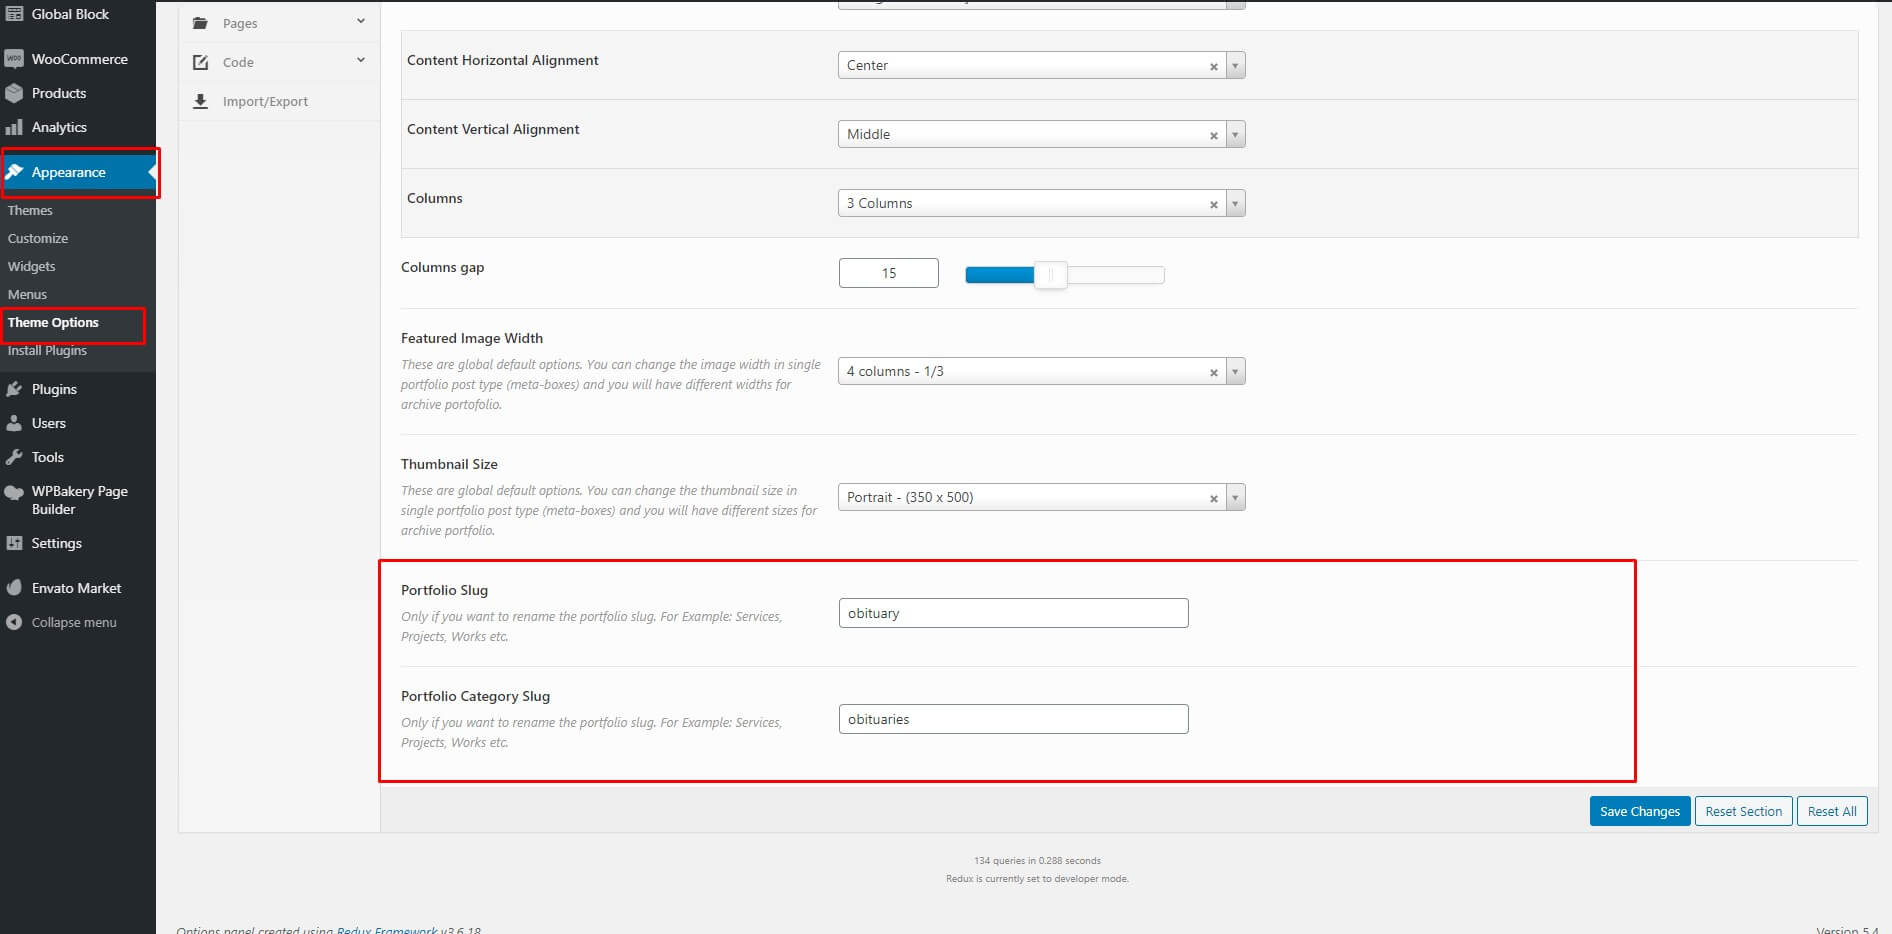
To change the portfolio slug (e.g: works, projects) go to Appearance > Theme Options > Portfolio from you WordPress admin panel and scroll to portfolio slug options

Please read this detailed article on how to work with menus on WordPress: Menus in WordPress: The Beginners Guide

Theme Options

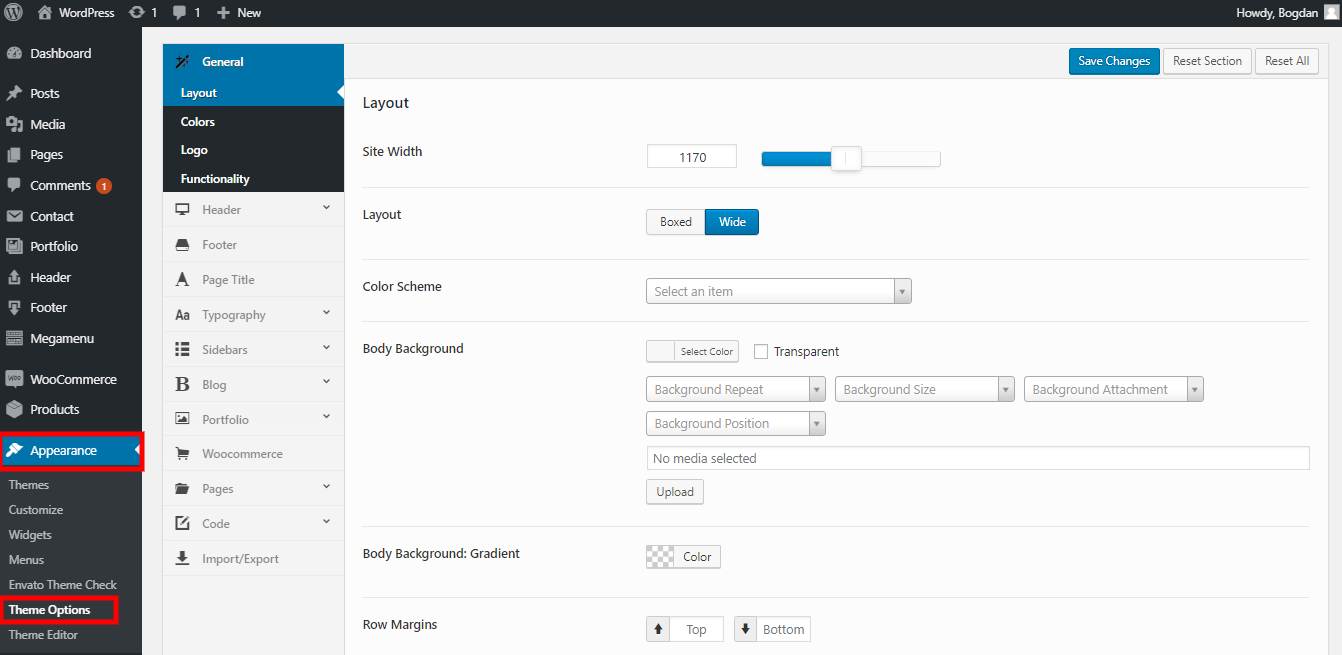
Theme Options allow you to flexibly control the appearance and behavior of the whole website as well as individual types of posts, pages and categories. Please take a few minutes and familiarize yourself with the theme options. We tried our best to sort the options and make them as descriptive as possible and we decided that there’s no need to list the options in this help file again. But, if you encounter difficulties or don’t know where or if an option exists, then feel free to get in touch with us.

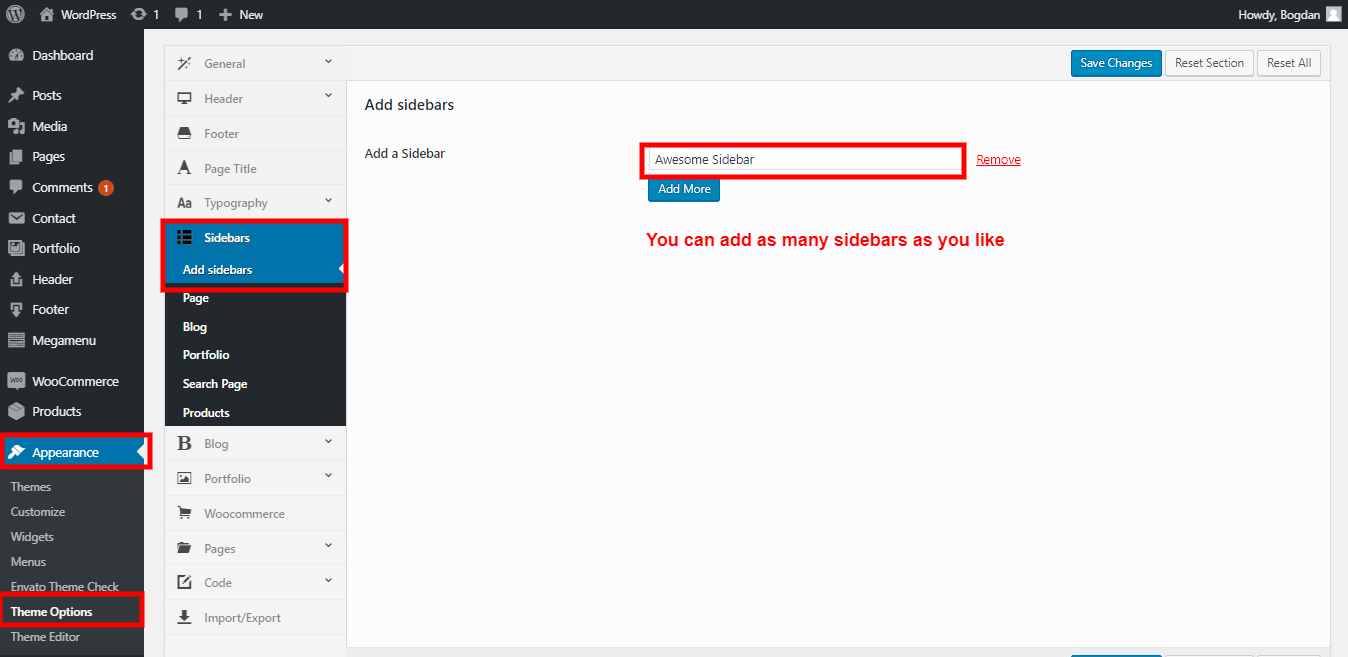
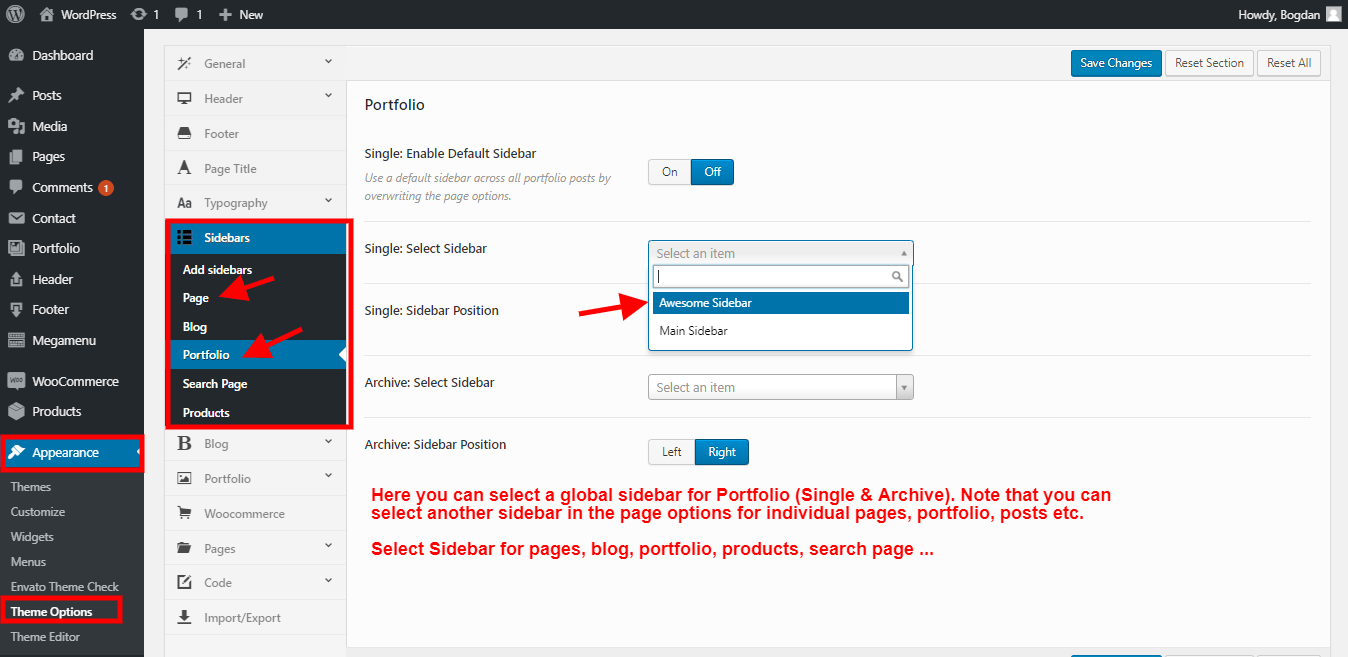
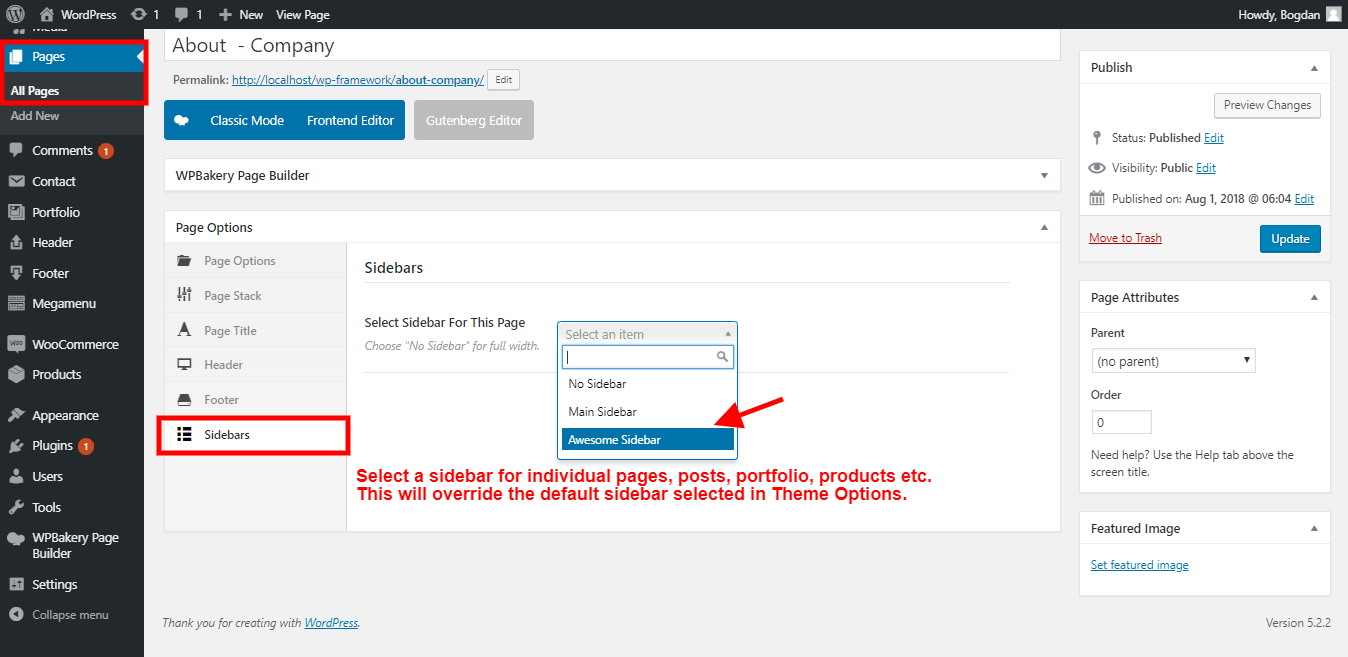
Please be aware that our theme provides a special inheritance hierarchy system for the Theme Options settings. It means that individual settings of each page (Metaboxes) may override global settings. For example, you can select a default sidebar for pages in Theme Options, but for a certain page you can select another sidebar with the help of Page Options (Metaboxes).

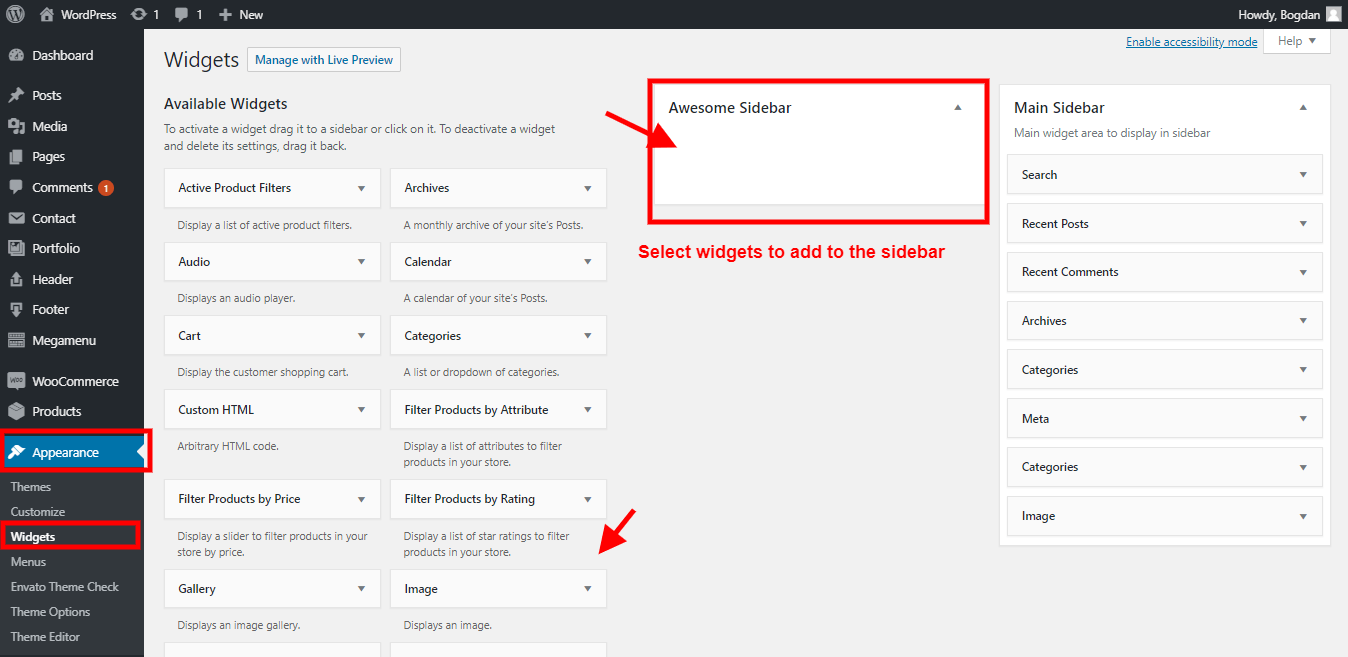
You can have as many sidebars as you like. Select different sidebars for different pages, archive pages or single posts.

Custom Fonts

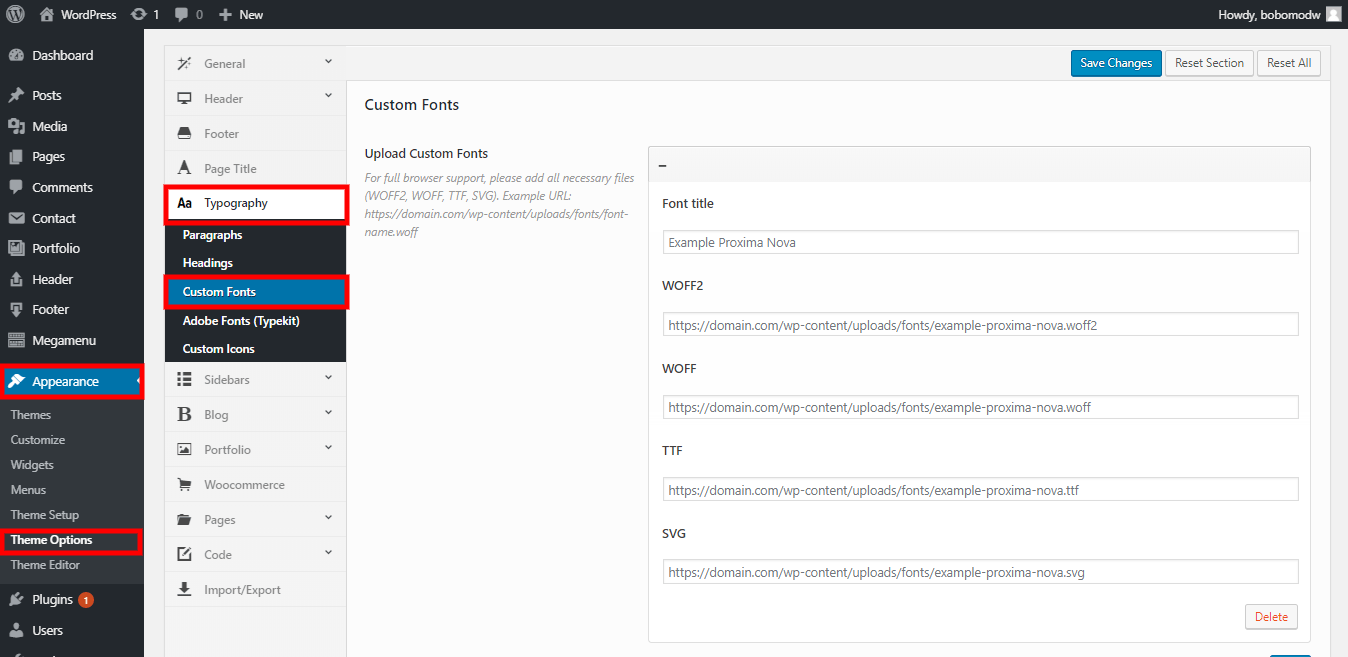
  • Create a new folder (e.g. fonts) and put your custom fonts here. For full browser support, please add all necessary files (woff2, woff, ttf, svg).
  • Upload this folder to wp-content/uploads/. Your font link should look like this: https://domain.com/wp-content/uploads/fonts/font-name.woff
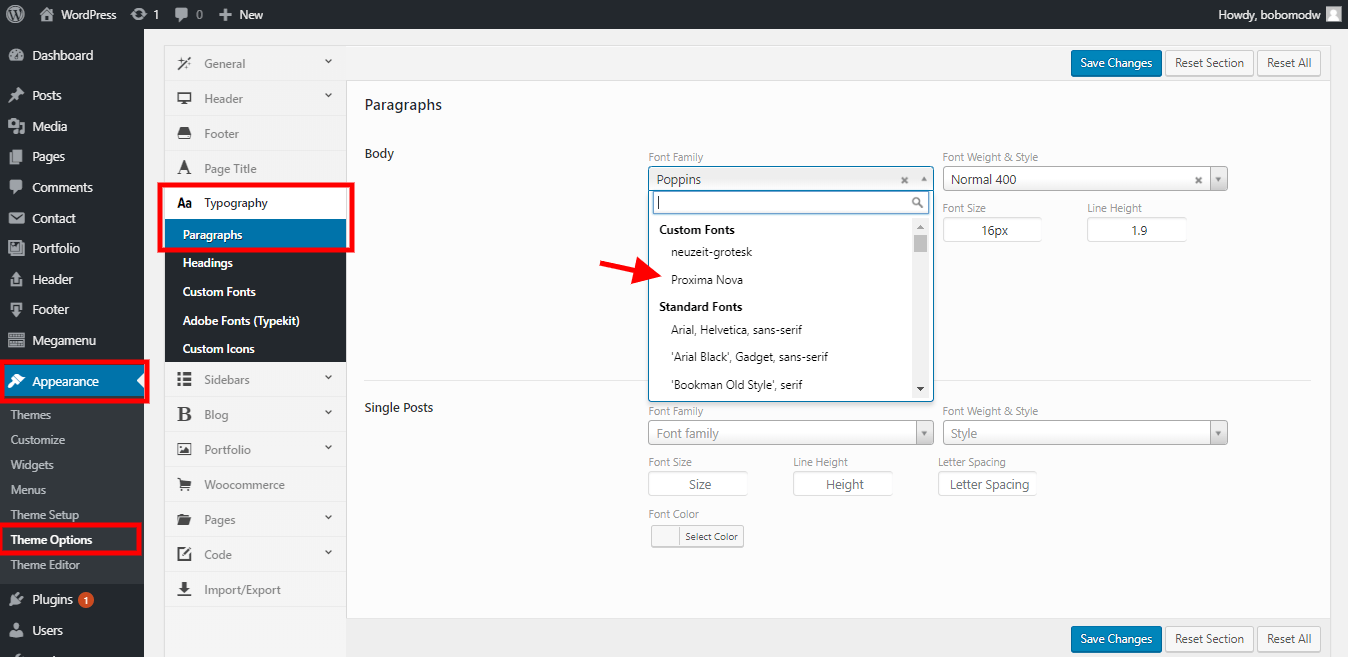
  • Insert the font link to "Custom Fonts" option from Theme Options (see image below), save changes and refresh the page. You will see your new added custom font in the Typography options from Theme Options.

Page Builder

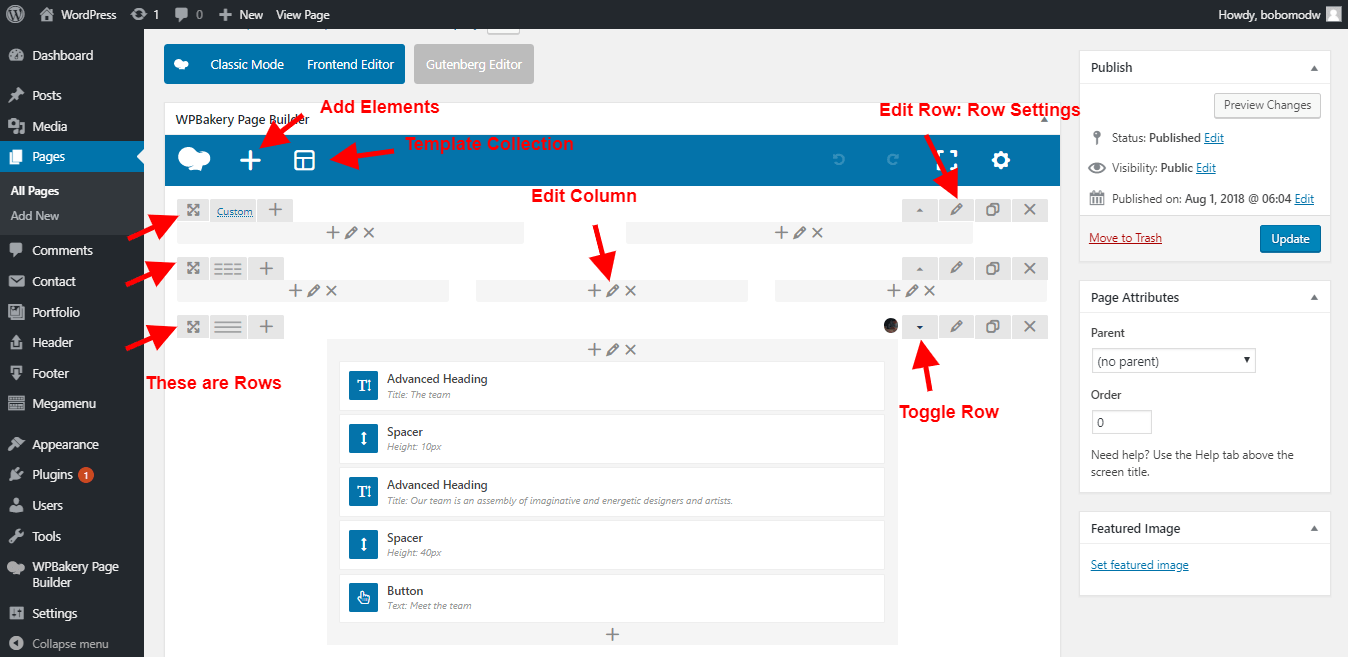
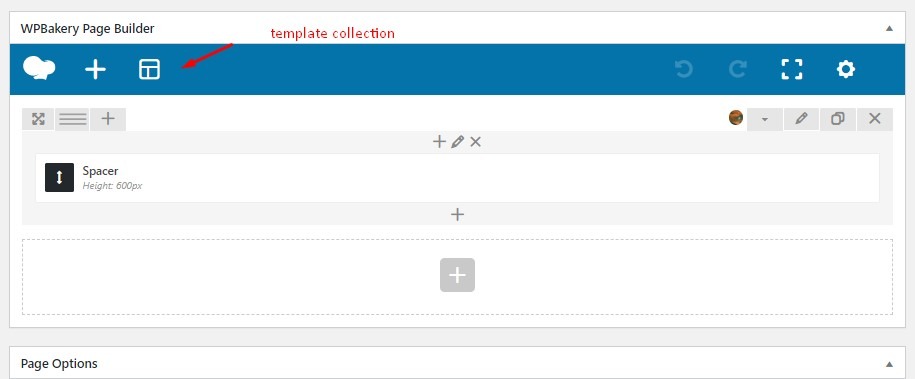
We used the WPBakery Page Builder Plugin to create this theme. If you are new to this plugin and have not used it before, please take a few moments and watch this Beginners Guide below on how to use the Builder. Note that the video is describing the basic page builder (rows and columns), and thus the interface might look slightly different from our theme. We enhanced the builder further to include templates collection and much more elements.

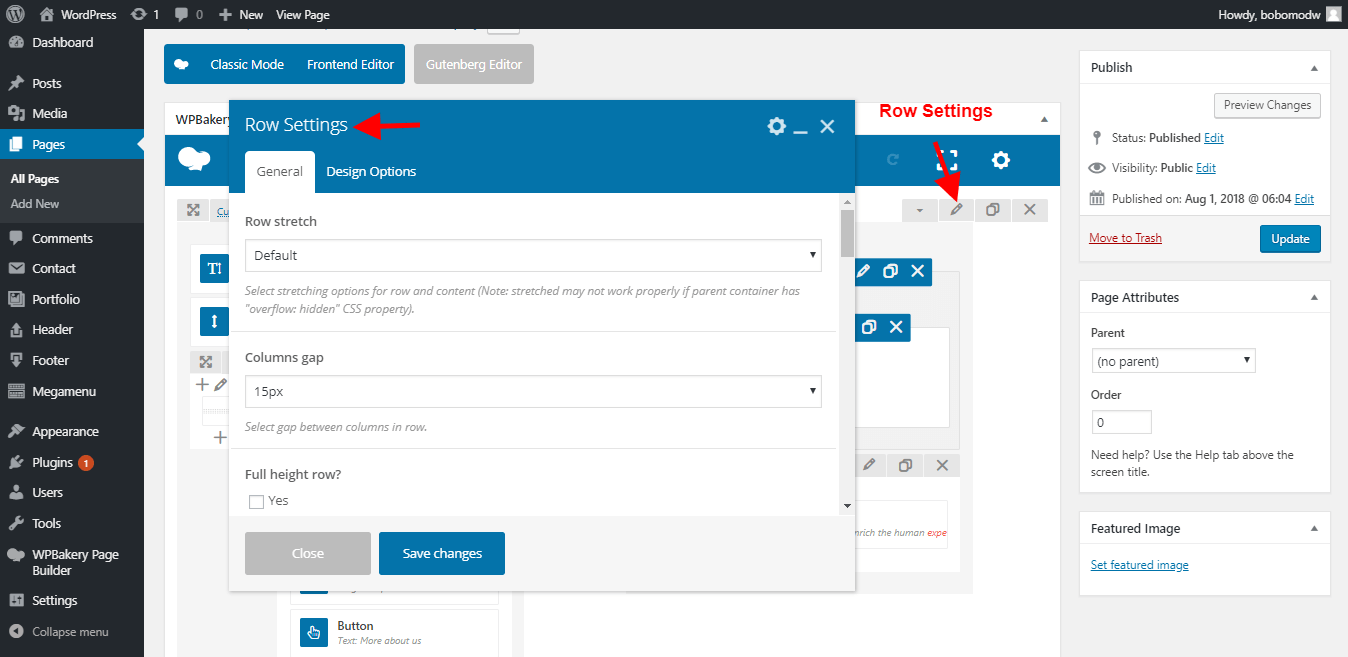
PAGE BUILDER BASICS (ROWS AND COLUMNS)

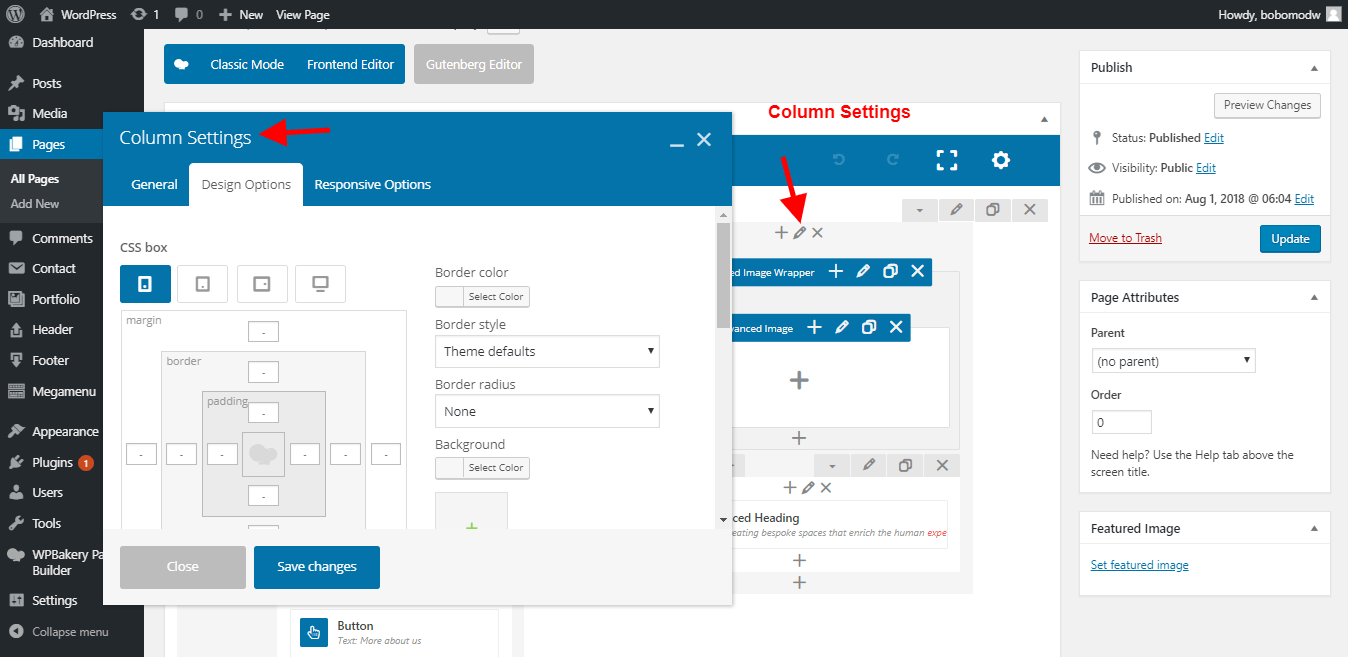
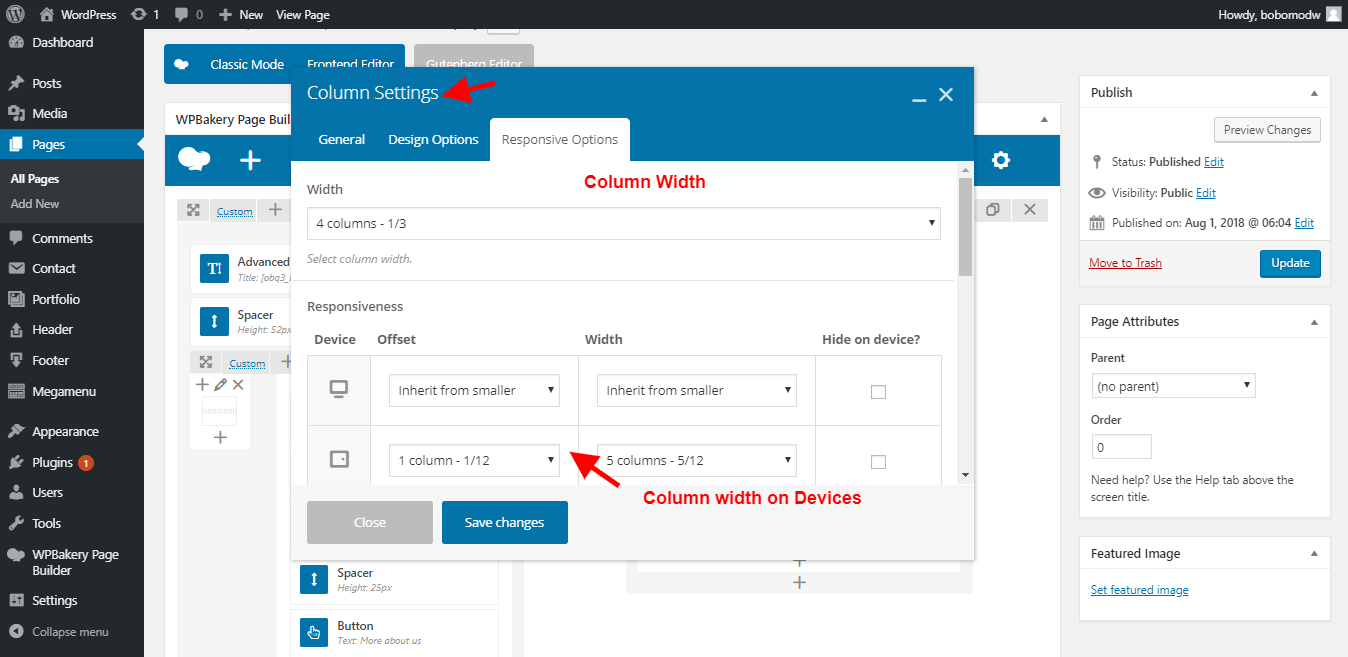
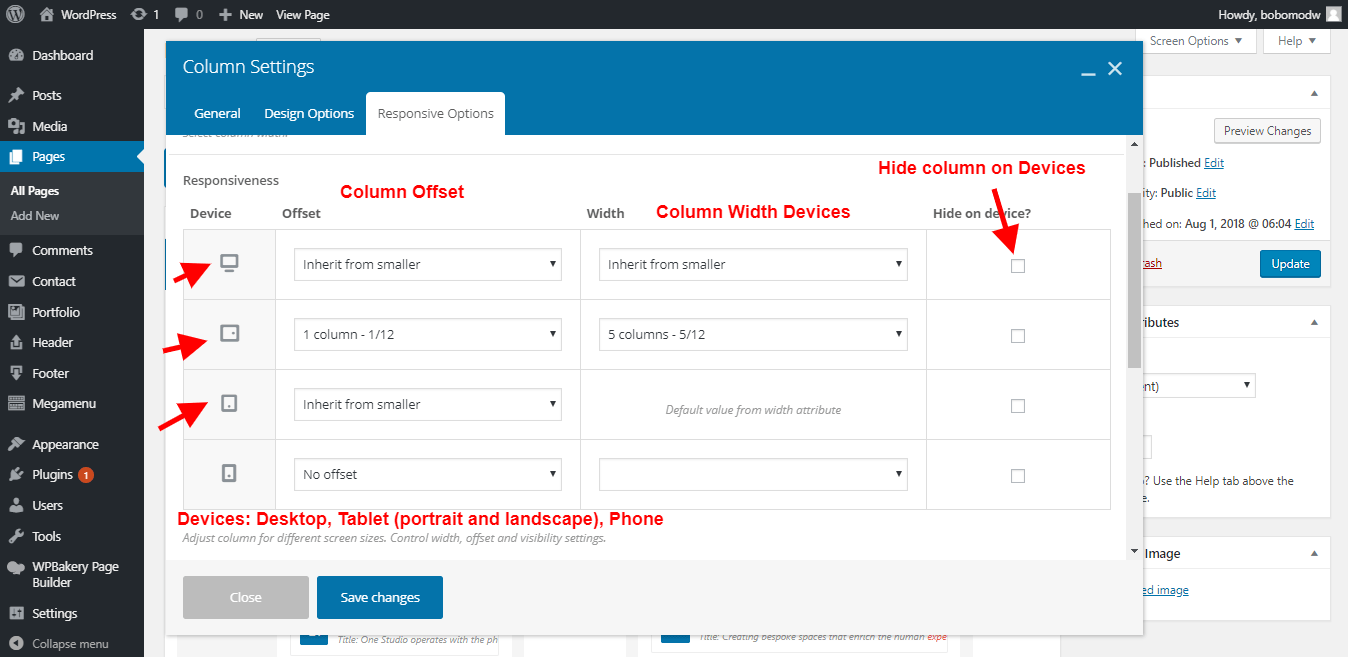
Please take a few moments and familiarize yourself with the Rows and Columns Settings. You will often use these in creating you website.

You can have sticky Rows, Video Backgrounds, Shape Dividers, Responsive Columns, Row Effects, Row Fade On Scroll, Parallax Background, Loading Effects, Slideshow Backgrounds, Advanced Column Animations, Gradient Backgrounds, Columns Box Shadow, Row Overlays and more…

Elements (Shortcodes)

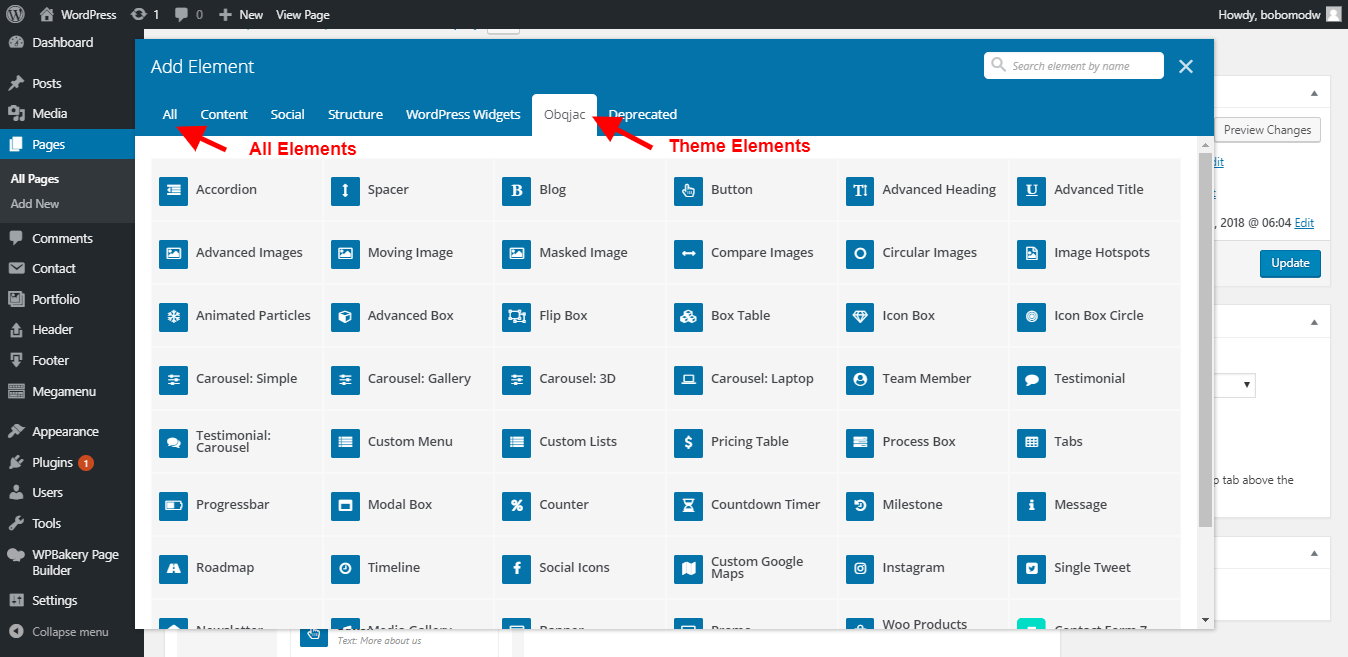
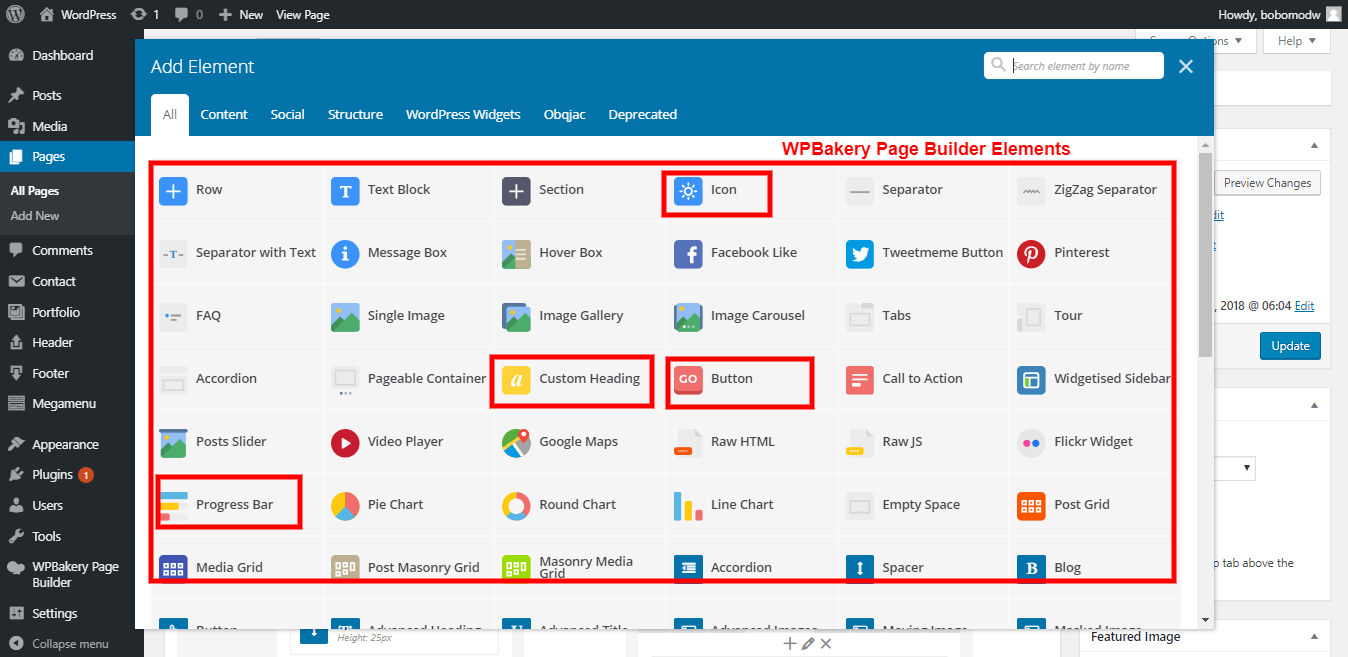
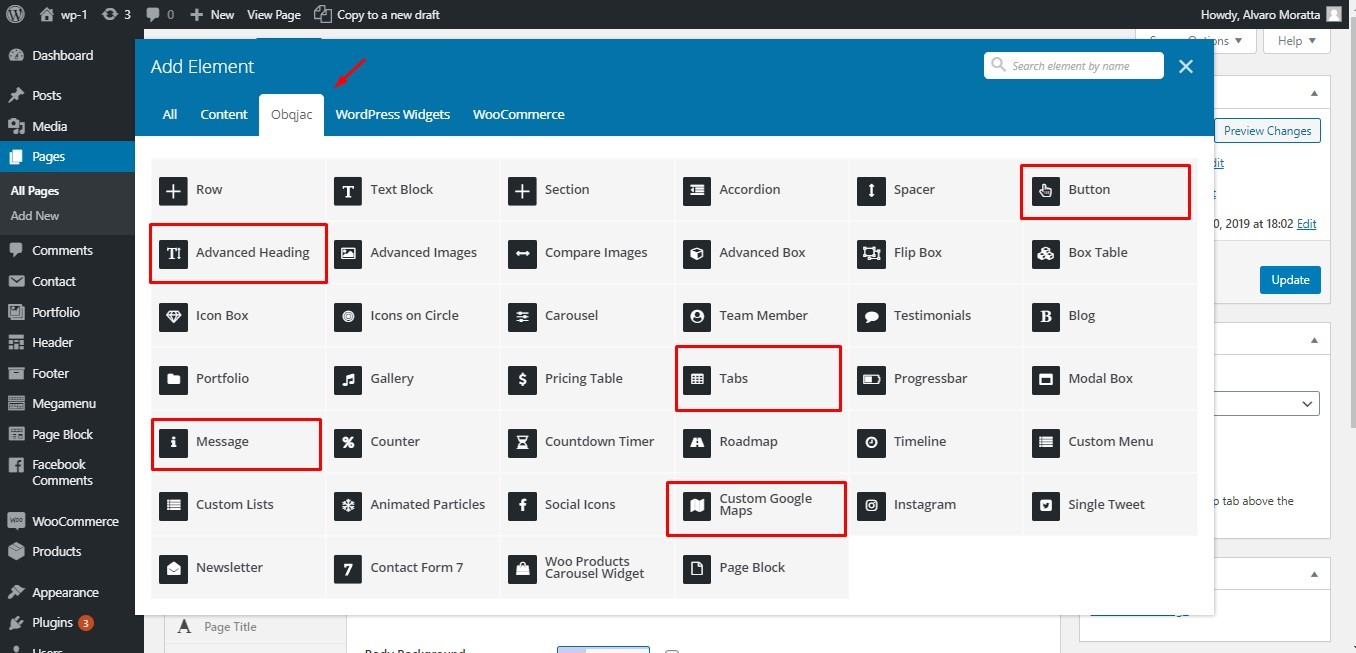
WPBakery Page Builder has its own elements and they might overlap with our Theme Elements (Obqjac). For example WPBakery has elements like: Custom Heading, Button, Icon, Progress Bar etc, and you can see that our theme has the same name for our Elements (Advanced Heading, Button, Icon Box etc).

We advise you use our Theme Elements instead of WPBakery's. Our Theme Elements are more enhanced and better suited for the Website appearance.

Please take a few moments and familiarize yourself with the Elements Settings. We tried our best to make them as descriptive as possible and we will not list them here again.

Template Collection

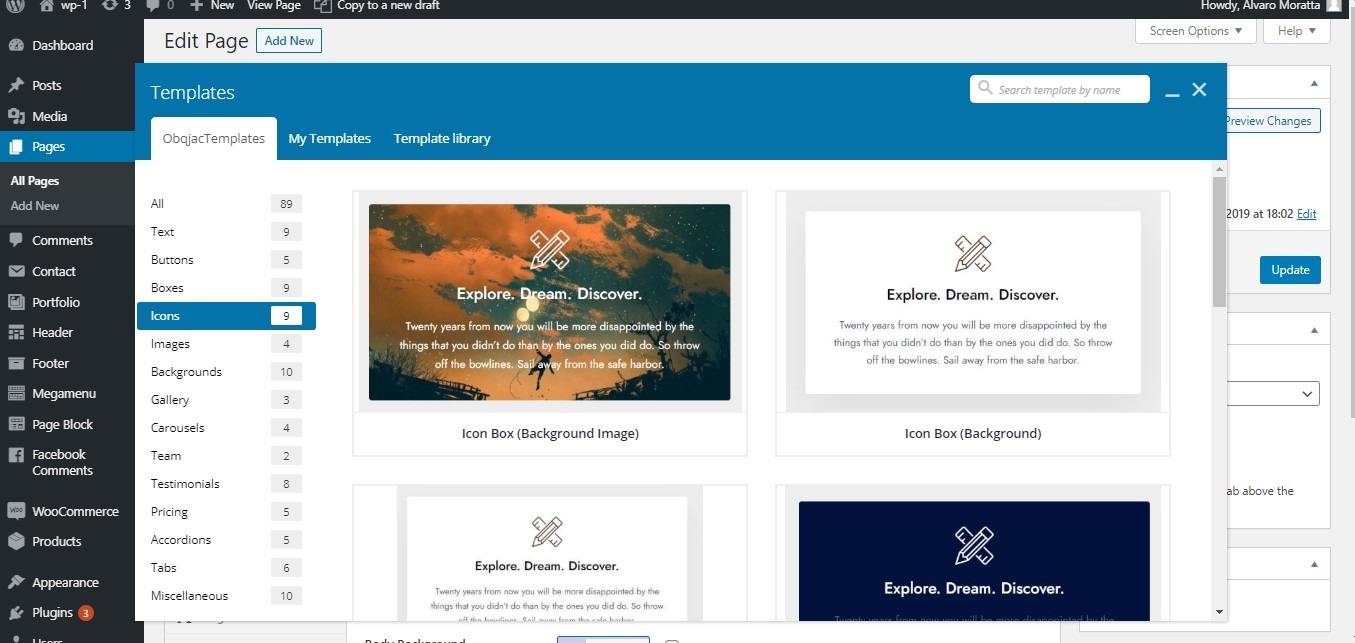
We suggest using the Templates Collection to create your website. Simply import the preferred template into your page and then you can customize it further. If you can't find a desired template, then you can create it with the Page Builder Elements.

Header Builder

Note that the theme includes also a Footer and Megamenu Builder with their own Metaboxes Options.

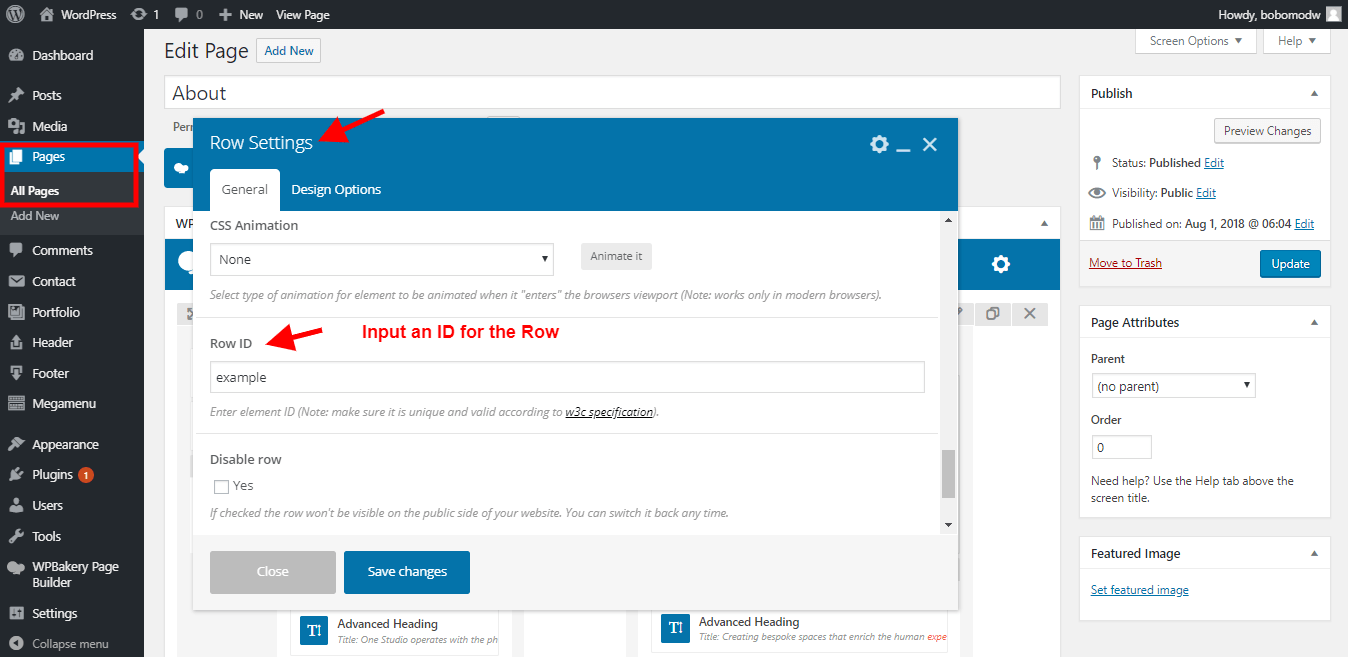
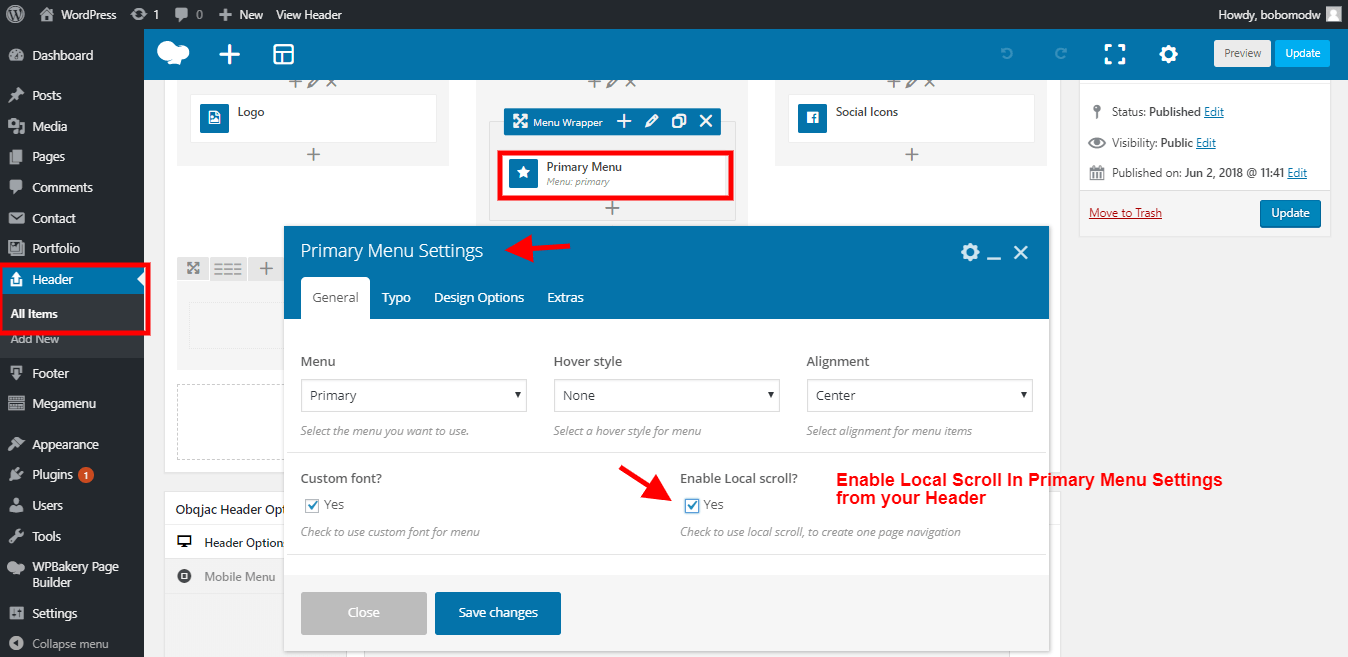
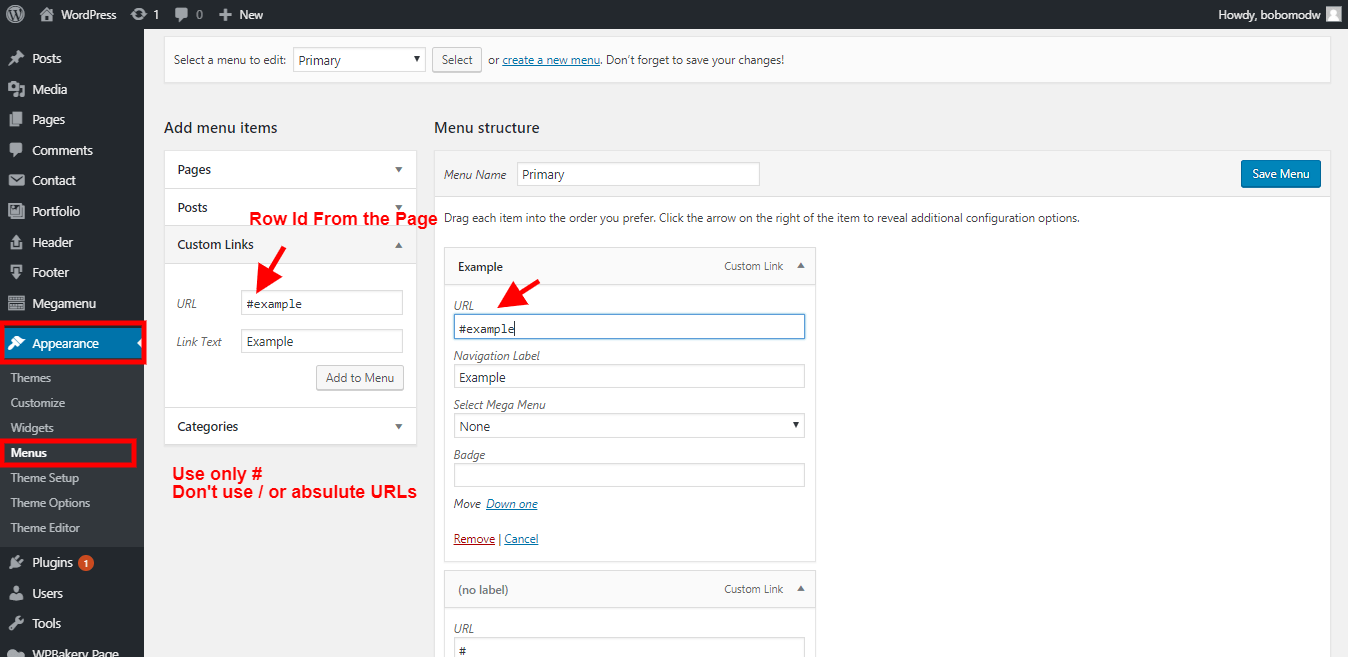
One Page Menu

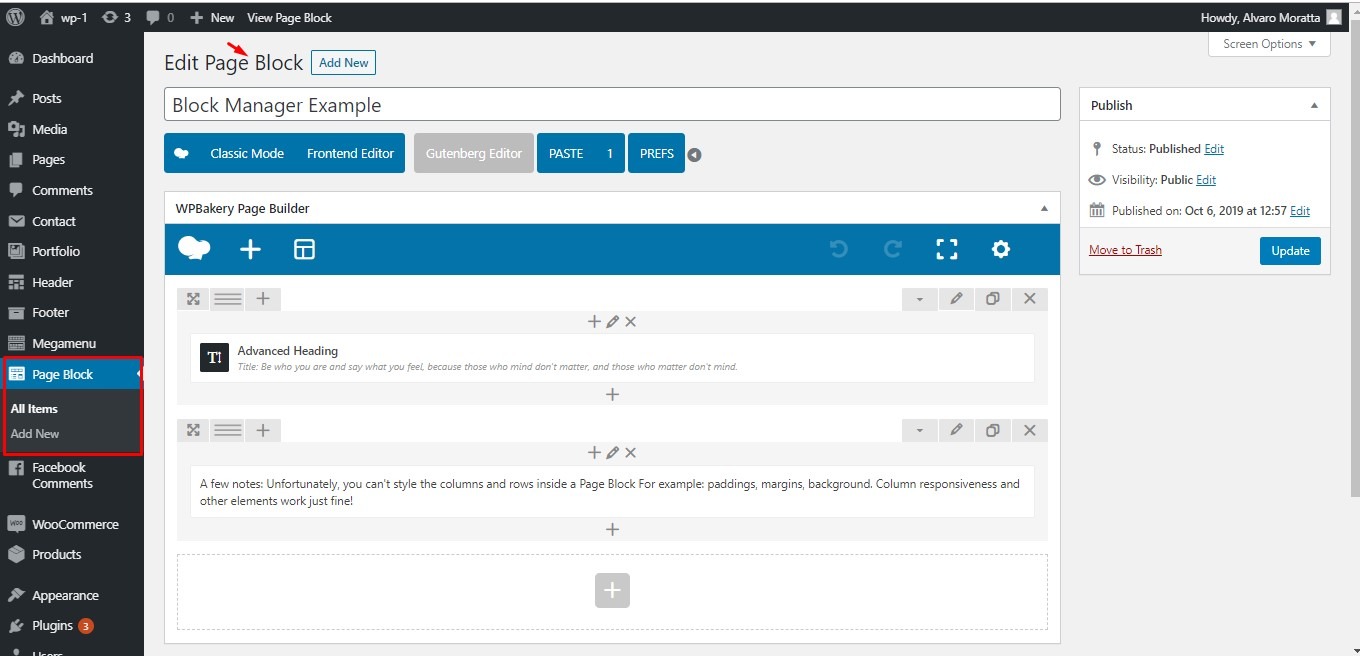
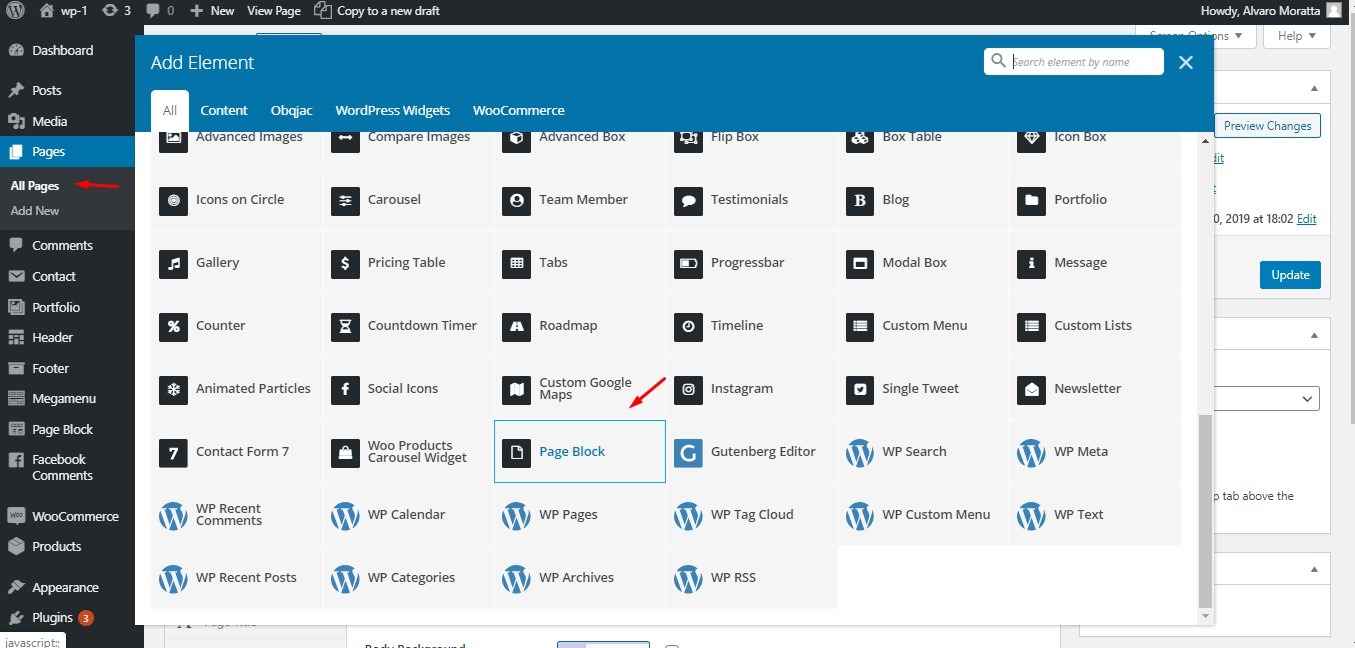
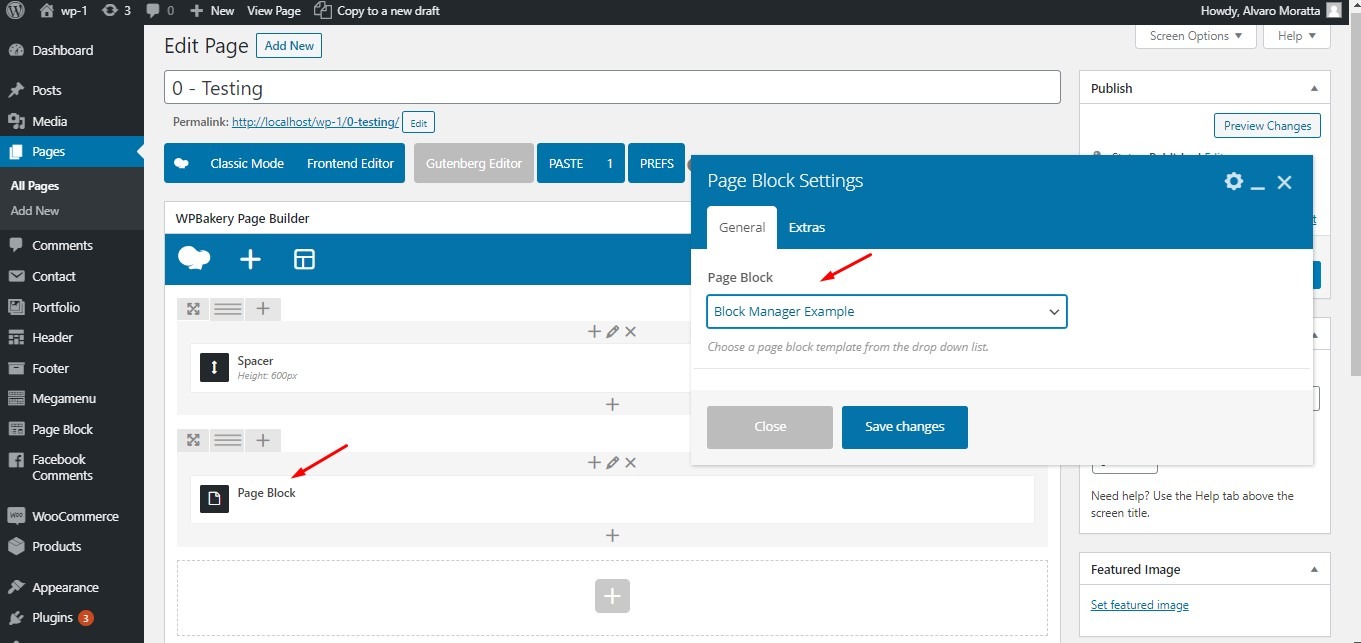
Global BLOCK (TEMPLATE MANAGER)

You can create a global block (post type) and include it in more pages. If you need to change something in it, simply modify the global block, with no need to make changes in the pages you included it.

WooCommerce

Our theme fully supports WooCommerce and it also includes some styled templates. If you'd like to set up a shop for your website, please read this detailed article on how to set up and work with WooCommerce: WooCommerce Tutorial

Contact Form 7

For contact forms, we used the Contact Form 7 Plugin. Please read this detailed article on how to use it: How to Set Up Contact Form 7

If you want to include a contact form in a page, use the Shortcode from the Page Builder.

Theme Translation

You can translate the theme using POEdit. The following article describes in detail how to do so: https://docs.themeisle.com/article/893-translating-themes-using-poedit

SPEED OPTIMIZATION (RECOMMENDED)

What improves your website performance? Good server configurations, VPS or WordPress hosting options, cache plugins, content and image optimization. These play a big role in your website's speed and performance. Take a look at the following article to learn how to best optimize your WordPress Website: https://www.wpbeginner.com/wordpress-performance-speed/
For short:

RTL

Our Theme supports the RTL languages. The following article describes how to enable RTL on your Website: https://createandcode.com/how-to-enable-right-to-left-rtl-support-in-wordpress/

WORDPRESS TROUBLESHOOTING

WORDPRESS SECURITY

If you are serious about your website, then you need to pay attention to the WordPress security best practices. Please read the following article: https://www.wpbeginner.com/wordpress-security/